
The ‘boil’ is perhaps one of the most anxious times for any brewer. For beginners, the question is always whether you need special equipment to boil up, say, 5 gallons of wort, or can you do it in your home kitchen. Ask 100 brewers this question and you’d probably get a very different answer from each of them.
So, can you easily boil 5 gallons of wort on your kitchen stove, whether it’s gas or electric?
You can boil your wort successfully on a conventional gas or electric stove. However, the length of time it takes and energy you will get out of your heat source will vary. Nevertheless, there are some steps you can take to help retain heat in your kettle and improve the efficiency of the boil.
In the following article, I’m going to go through everything you might want to know about boiling your wort in your kitchen on brew day.
I’ll cover exactly how long it’ll take you to get the wort to the boil, the best equipment to use as well as answering some more detailed queries about the boiling process itself. Stick around to find out everything you need to know before you start this key stage in your brew!
I’m not going to lie to you, boiling up your wort and maintaining the desired temperature is going to be better if you invest in a decent propane burner or even a turkey fryer kit. See my recommended gear page for my personal favorites here.
However, this option may not be open to everyone. If you just don’t want to spend the money on your first brew day, that’s fine just use your kitchen stove. Also, if you live somewhere that doesn’t have a safe place to use a high power heat source, then again you can get by in the kitchen.
Why is wort boiled?
Although most brewers don’t really give it much thought other than they must follow the right boil schedule, boiling your wort is immensely important.
For one thing, it effectively sterilizes the wort and kills off all that nasty taste ruining bacteria which would leave our beer tasting like, well, most commercial beers (just kidding, or am I?). (buy beer from local breweries)
Another important thing that boiling your wort achieves is to stop enzymes which have been activated by mashing grains. These enzymes are responsible for releasing the fermentable sugars from the grain used in brewing beer, so we only want them to work when we say.

Boiling also concentrates the wort and by boiling off excess liquid from the mash, we can achieve the desired original gravity of our wort and later beer.
The boil also helps get rid of some undesired aromas and other compounds which will negatively affect our beer later on. Substances such as DMS which is likened to a vegetable smell is lost as you boil and this is exactly what we want.
Another reason to boil your wort is to attack the proteins which were also extracted during the mashing process. This can lead to cloudiness in your beer (see my article about how to reduce cloudy or hazy beer) and we want the protein to coagulate during the hot break achieved by the boil.
Boiling also helps the brewer to extract bitterness from the hops added in the process and these alpha acids are what help us balance the sweetness of the malted grains and give our beer a more palatable flavor. Another useful effect of boiling wort is to alter the color of the beer, especially with extract-based recipes, as caramelization can occur to give a deep color to the finished product.
Choosing your boil kettle or pot.
Even before we get to choosing the type of heat source you are going to be using, you need to consider what you will boil in. You can literally use any pot that you have handy, but there are some things to consider which will make the job both easier and faster.
Size matters
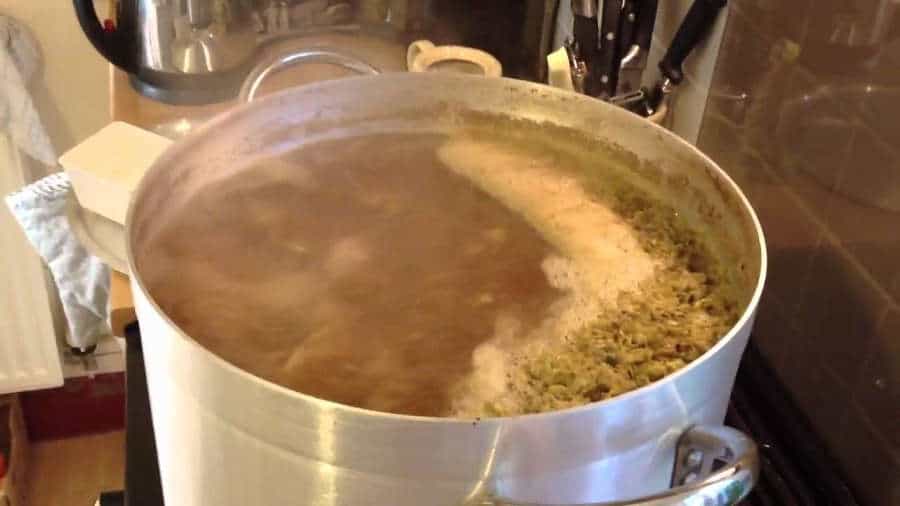
Firstly, the size of the pot you are using. As the wort boils it will start to climb up the side of the pot you are using and above all else, we want to avoid a boil-over. This is because when the wort boils it will push compounds such as proteins to the surface.
You’ll want them in your beer later to help with head retention (see my article on how to get better foam on your beer), so don’t let them escape over the side of the pot. The easiest solution is to boil in a pot that has at least an additional gallon capacity to the amount you are brewing. I.e, for 5-gallon batches at least a 6-gallon capacity pot.

Use the right metal
When it comes to boiling up large amounts of liquid on, often, weaker heat sources then heat conduction really matters. Although often considered cleaner and more robust, stainless steel isn’t as good a conductor as copper or aluminum. In order to make every unit of heat count, use these metals over stainless steel if possible.
How long does it take to boil 5 gallons of wort?
A conservative guess would be around 25-30 minutes for the average gas stove and perhaps as long as 35-40 minutes for an electric one. Of course, this really depends on many factors from the initial temperature of the water, the BTU/h capacity of the stove (gas) and even how clean it is. There are some hacks to speed up the process though.
Most stoves will give out about 7,000 to 9,000 BTU (British Thermal Units) per hour, with gas stoves being slightly more efficient than electric ones. It takes about 8.34 BTU to raise the temperature of 1 gallon of water by one degree Fahrenheit. But remember that denser liquids, such as wort, will have a higher boiling temperature than water.

First of all, if using a gas stove or burner make sure that your gas burners are not blocked or clogged with soot. You can check this first by lighting the stove and checking that the burner is firing evenly around the ring. Even if it is, give the burner a good clean and use a wire brush to get right into each gas outlet.
Also, make sure that your gas line isn’t pinched or kinked in any way, you’ll be able to see this from the back of the unit. Another thing to consider is that your gas stove may have been restricted in some way, especially if it was originally sold in another part of the country. Different altitudes, for instance, would require different levels of energy to boil liquids. If you can adjust your burner to get more gas flow, then this will reduce boiling time.
To cover or not to cover boiling wort
Now, this is an easy question to answer wrong if the two people aren’t talking about exactly the same thing. We all know from home economic studies that boiling a liquid in an enclosed pot will reach the boiling point faster.
So, in this sense, it would be sensible to leave the lid on your boil kettle or pot until JUST BEFORE it boils. However, you definitely SHOULD NOT leave a lid on the boiling wort after it has reached the boiling point, or even just before.
The reason why we don’t want to cover wort as it boils is that we would trap Dimethyl Sulfide (DMS) in the wort and this can give an off-flavor to our finished beer, a little like creamed or cooked corn. Another reason is that leaving the lid on is more than likely going to lead to a boilover, which we don’t want as that’s valuable compounds for later on in our beer’s life!
Tips to get to the boil faster and ensure an overall boil of your wort
Tip #1: Make the heat count
Even if you have an awesome stove, choose the right metal for your boil kettle and live on top of a mountain (lower temperature boil!), you could still be losing heat to inefficiency and poor heat retention.

One novel approach I came across was to actually insulate your boil kettle or pot with a reflective foil blanket or two (this sort of thing on Amazon is what I mean) secured by electrical tape. Wrap the blankets around the pot and cut some holes for the handles, then secure it all in place with the tap. This effectively keeps most of the heat inside the liquid and, even though it isn’t covered over, the heat retention is greatly improved. This means that you can achieve a quicker and higher temperature boil with a less efficient stove.
This is ideal for electric stoves as there is less chance of the foil being set alight and melting. Never the less, if you try this you should leave a couple of inches at the bottom of the pot free from any foil blanket.
For gas stoves, you can do the same thing but you really need to have flame-retardant insulating material, something like this can be found on Amazon for your reference. Again leave about 2 or 3 inches of bare metal at the bottom of the pot to reduce the risk of fire and also don’t leave the room during the boil as well as keeping a fire blanket or extinguisher handy.
You could also use a similar approach for keeping your fermenter warm when brewing over the winter. It’s really a cool approach.

Tip #2: Double up on the boil
If you don’t have the time or resources for tip 1, perhaps you are brewing today, then you can always try this short cut to getting more power from your stove.
Simply straddle your boil kettle over two burners and turn them both up to full. If you have a metal cooling rack, something your partner won’t miss if it gets damaged, you can balance your bot on this to give it more stability (as that pot will be moving about as it boils). This is a quick and easy way to double your heat source instantly.
Tip #3: Start with hot water.
Although you are going to begin most all-grain recipes with your warm mash water, it’s not going to be anywhere near the amount of water you need for your boil. This is even truer of extract kits which require you to do no mashing (or minimal steeping) at all.
So, when adding water to your wort to bring it up to the required boil quantity, you can use already heated water. We all know from science class that hotter liquid will quickly reach boiling point, so why not give your stove a helping hand by using a conventional kettle to heat most of the water beforehand.
Tip #4: Use fractions
If you feel confident doing it, then you can split your batch in half, thirds or even quarters. as long as you split the proportions of your mashed wort and hops into even batches you can boil them in separate vessels. This will enable you to use multiple burners if you have them and it will reduce the time it takes to reach the boil. However, this will involve some very delicate manipulation of the heat source and you may want to have thermometers handy to ensure an even boil temperature in different batches.
Can you boil wort too hot?
In pure temperature terms, no you cannot boil liquid higher than its boiling temperature. Once it reaches that point, say 212°F (100°C), depending on its density and altitude, water will simply turn into vapor as it evaporates.
So, in the same way, that you can’t burn water, you don’t need to be concerned about surpassing the ideal temperature in the boiling phase of your brew day. It’s not the same concept as the mash where we want to control the temperature in order to adequately manipulate the grains we are using to extract the maximum usable sugars and other compounds into the wort. No, a boil is a boil.
This being said, if you are using an extract mix then it is easy to caramelize your wort and produce a much darker color than you were anticipating. In the same way, keeping a rolling boil going with your stove (or propane burner) turned full up can simply waste fuel unnecessarily.
Also, a sustained maximum boiling temperature will lead to a lot more liquid evaporating then you may have wanted. The fix is easy, just turn down your burner to maintain that rolling bubbling in your wort and perhaps top up the water in it before pitching your cooled wort later.
Related questions
What is a full wort boil?
This refers to the process of boiling the entire body of liquid so that the maximum amount of unwanted compounds can be boiled off of the wort. If the heat source is not powerful enough then the brewer risks not being able to heat the entire amount of wort to the boiling temperature to achieve a full boil.
What is a hot break?
A hot break mainly affects the proteins found in the wort as the mashing process. As the wort heats up the proteins start to coagulate and rise to the top of the liquid. At this stage, the wort may appear like eggy soup. After time these proteins will sink to the bottom of the wort. This is known as the hot break.
I recommend not trying to remove the hot break as those proteins can be useful later in the beer’s life. At any rate, the ‘Trub’ should always be left in the 1 or 2 inches of the bottom of the fermenter and not carried over into bottled or kegged beer.
Do you remove hops after the boil?
Yes, hops need to be removed from the boiled wort after the desired boil time and before the cooled wort is pitched in a fermenter. However, if you are using hop pellets these will dissolve in the wort during the boil and sink to the bottom of the boil kettle as it is cooled.
You can then just leave them behind when you transfer your wort from container to container by discarding the last couple of inches of liquid at the bottom of your boil kettle. Hops that have been added in a muslin bag can just be fished out and remove directly before cooling the wort down.
The hops used in the boil have done their job and you don’t need to keep them anymore. However, some future stage of the recipe may call for dry hopping, where you need to use fresh (unboiled) hops and these are left unheated just to infuse with the fermenting beer.
