
There’s no denying it, home brewing beer is a science with many important factors to consider. A hydrometer is a wonderful tool that can help ensure a better beer each and every time.
So what is a hydrometer exactly? A hydrometer is a device that measures its own displacement of liquid and therefore can help you calculate the density (sugar content) of your beer or other alcohol. Using these measurements it is possible to tell when fermentation has ended and calculate the alcohol by volume (ABV) of your beer.
Is a hydrometer an essential piece of kit? Certainly, but it is in theory possible to do without one. However, you are going to have to calculate a lot more data then you have to.
How does a hydrometer work?
A hydrometer is an instrument with many different applications for different industries, but in short, it measures the specific density of a liquid. The specific density (SG) is the relative density of a liquid compared to water. In the case of alcoholic drinks, this density is determined by the presence of sugars in the liquid.
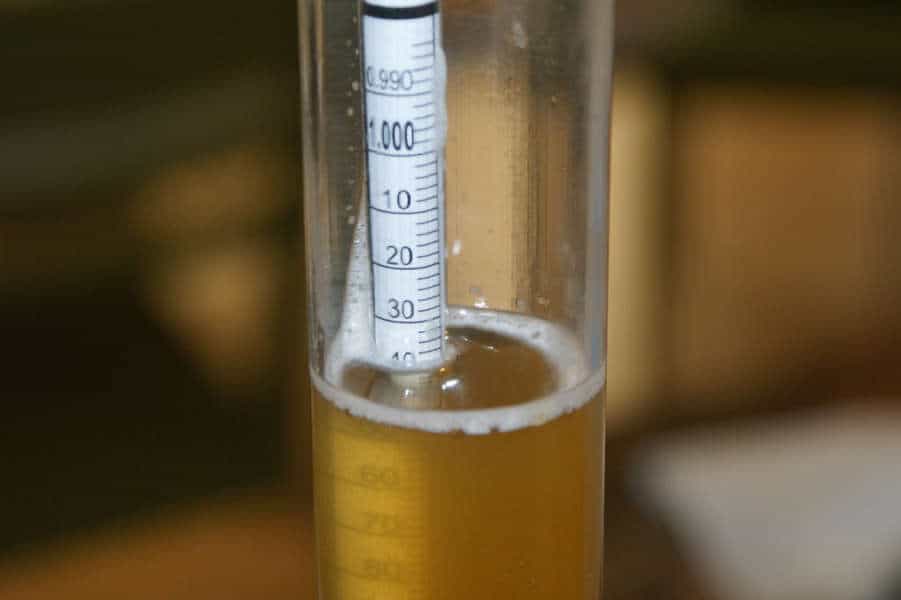
A hydrometer is a longish cylindrical device with a bulb at one end. It’s designed to float freely in the liquid it is introduced into and the point at which the stem portion meets the surface of the liquid, this will give us our specific gravity reading.
The hydrometer we use in brewing beer is more precisely called an alcoholometer or “Proof and Tralles” hydrometer, but let’s just refer to it as a hydrometer because we aren’t real scientist now, are we?
Most hydrometers used in brewing beer will give you a “potential” alcohol content right on the stem, which has been calculated from pre-calculated specific gravity. However, most of us will just need a Specific Gravity reading of between 0.98 -1.12 °SG (usually measured in °BX). From here, we need to make some calculations of our own.
How to read the hydrometer
Most hydrometers come as a little kit with the hydrometer itself and a sample container. If it doesn’t, make sure you get yourself a test jar with a nice wide base to avoid tipping (this will break the hydrometer). The hydrometer designed for alcoholic beverages will give you two readings, a Brix (°BX) and potential alcohol (measured as ABV).
In order to use your hydrometer to measure the specific density of your wort, you first have to extract a sample of the liquid to use. DO NOT put your hydrometer directly into your main batch as this can introduce bacteria, especially during fermentation.
Instead, get yourself a turkey baster or “wine thief” to take a small sample to test. You need about enough to fill a test-tube or small upright container.

Slowly introduce the hydrometer into the liquid and make sure that it is floating freely. When you are sure that it is, look at where the surface of the wort meets the stem of the hydrometer. You’ll notice a sort of bubble effect (meniscus) which occurs when light is refracted through the liquid. Take a reading from the bottom of this bubble and not the top.
What can I use a hydrometer for in my brewing process?
The hydrometer is used to tell us the density of the wort during the brewing process. This basically means how much extra stuff is in the water contained in the wort. That extra stuff is sugar which has been released from the grain starches during mashing.
Why is that important information exactly? Well, beer is made through yeast converting sugars in the wort into ethanol and carbon dioxide. The density of our wort can tell us how successful the yeast has been and whether fermentation is completed or not.
There are two key measurements that need to be made and noted. The first is before we introduce any yeast into the wort and just after the mashing phase. It’s called Original Gravity (OG). It tells us where our wort began in terms of density and will be the level all other measurements are compared to.
The other significant measurement we make is after fermentation has ended (although you need a hydrometer to help you determine this too). It is called the Final Gravity (FG) and will give us the final density reading before we proceed to the bottling or kegging stage.
By using these two measurements we are able to calculate the alcohol by volume (ABV) which will tell us the level of alcohol in our beer. This is, of course, some very important information if we want to gauge the strength of the home-brew.
In addition to finding out the Final Gravity of this particular batch, using a hydrometer and making detailed notes throughout your brewing process will help you consistently produce the same quality beer (as much as can be expected) or to improve the beer with each attempt.
If you have a higher level FG than expected from your recipe instructions, this could indicate that fermentation hasn’t ended or has “stuck”. This is a really important way in which a hydrometer can help the brewer determine the level of fermentation in their beer. If this is the case and you think your fermentation is not going as it should, then check out my article on fermentation.

How to calculate alcohol by volume from the Original Gravity (OG) and Final Gravity (FG)?
When you have your measurements you just need to subtract the Original Gravity from the Final Gravity then multiply that number by 131.25 (representing ethanol in this process), this will give you the alcohol by volume (ABV).
(OG-FG) x 131.25 = ABV
Example:

Original Gravity = 1.065
Final Gravity = 1.011
ABV = 7.1%
(1.065 – 1.011) = 0.054*131.25 =7.0875
How accurate is a hydrometer?
A hydrometer is made on pre-calculated measurements of specific gravity which itself has been calculated on many factors. It’s important to account for the difference between your wort and the control sample the hydrometer was designed for.
This sounds more complex than it is. Some older models have a temperature calibration of 59-60 °F whereas some newer ones can be used up to 70 °F. Just make sure that you find the correct calibration for your hydrometer in its instructions.
Ideally, you want your wort sample to be the same temperature as the calibration for your hydrometer. Sometimes this just isn’t possible, so you need to work with an equation chart to correct for the actual temperature of your sample.
In order to make sure that your hydrometer is and remains calibrated to the right temperature, you can take some distilled water and heat it to the correct temperature and test your equipment. In distilled water, the density reading should be 1.000 ° SG. If it isn’t, then you can take the true reading into consideration. Alternatively, you can add a little bit of weight to the hydrometer (tape, nail polish, vanish, etc.) until it does read 1.000 °SG.
A great resource is this PDF from homebrewersassociation.org
How to convert a reading for an off-calibrated hydrometer temperature.
As most hydrometers are designed to a calibrated liquid temperature and most brewers don’t have the resources to accurately cool their wort, you may need a conversion table like the one below to calculate your true gravity.
°F | °C | G Change |
|---|---|---|
59 | 15 | 0 |
60.8 | 16 | 0.0002 |
62.6 | 17 | 0.0003 |
64.4 | 18 | 0.0005 |
66.2 | 19 | 0.0007 |
68 | 20 | 0.0009 |
69.8 | 21 | 0.0011 |
71.6 | 22 | 0.0016 |
73.4 | 23 | 0.0016 |
75.2 | 24 | 0.0018 |
77 | 25 | 0.0021 |
78.8 | 26 | 0.0023 |
80.6 | 27 | 0.0026 |
82.4 | 28 | 0.0029 |
84.2 | 29 | 0.0032 |
86 | 30 | 0.0035 |
87.8 | 31 | 0.0038 |
89.6 | 32 | 0.0041 |
91.4 | 33 | 0.0044 |
93.2 | 34 | 0.0047 |
95 | 35 | 0.0051 |
96.8 | 36 | 0.0054 |
98.6 | 37 | 0.0058 |
Note: All you need to do is to add the G change to your Original Gravity.

Example: If my reading was 1.019 at a temperature of 95 °F/35°C I would add 0.0051 to my reading. (1.019 + 0.0051 = 1.0241 SG)
You could sit down and do the conversion manually by looking at the chart above and calculating it. But, it’s the 21st century and we just don’t need to do that anymore.
You can get a whole host of apps on Google Play of the App Store which will quickly give you the correct specific gravity if you key in the data you have. Just download a few and see which one you like the best.
Also, a lot of onlIne brewing supply websites will have an online calculator to give you the adjusted numbers, but I still find doing it on my phone much more convenient.
Do I need a digital hydrometer?
For most brewers the answer is no, you really don’t need to invest in a digital hydrometer.
Unless you are going to be brewing on an extremely regular basis and need to be excessively stringent in your brewing measurements, a digital hydrometer may just be overkill for you.
The advantage of a digital hydrometer, however, is that it can be calibrated to the temperature of your wort and give you instant conversions and highly accurate density readings.
You can also buy certain models which you can leave in the wort as it ferments into beer and get regular updates on its change in density. Nevertheless, this is only really recommended for those who are willing to invest a fair amount of money into such a device.
I personally wouldn’t recommend a digital hydrometer to 90% of homebrewers as the “analog” devices are just fine when you use them correctly.
Tips to stop hydrometers from breaking so often.
Hydrometers are incredibly fragile instruments and can be easily broken if not handled with care.
Some common ways to break them are simply dropping them when going about your business, snapping them in your hand when cleaning (can lead to a nasty cut), having it broken when the sample container tips over and snaps the stem, or (with lower quality models) melting part of it taking the Original Gravity from a hot sample. They can also stick to table tops and things if they haven’t been cleaned properly after use, this might result in you snapping them while trying to pry them off.
Tip #1
If you use the same area for brewing each time and can fit a bracket to the wall to hold the hydrometer in place, do that.
Make sure that you are able to fit your sample container underneath and that it can itself stand up stably. This bracket will mean that you don’t risk tipping over the sample container and snapping your hydrometer.
Tip #2
After using the hydrometer wash it in either hot water (if taking a hot post-mash sample) or warm water (after a fermentation sample) to remove any excess sugars or stickiness. Leave it to dry in a test-tube or upright container or on a cloth. This will avoid the annoying situation of the hydrometer sticking to your worktop and you snapping its stem off as you pick it up.
Tip #3
After use, make sure that your hydrometer is stored in a protective case or wrapped in protective material. This is particularly important if you are forced to pack up all your brewing equipment and store it between batches.
Tip #4
If you are a serial hydrometer-breaker, then you may just need to switch from the glass model to the plastic model. At least it will be slightly less fragile and may survive longer.
Alternatives to a hydrometer
A hydrometer gives us the density of our wort and, later, beer, so that we can calculate important things such as its ABV. But, this isn’t the only way to determine a beer’s density. There are some alternatives to a hydrometer which have their merits.

Refractometer
A refractometer also helps the home brewer to measure the density of their wort or beer. However, rather than measuring the displacement of its own mass to calculate density, it works on the principle of refraction.
When light passes through liquid it doesn’t travel in a straight line, it is distorted to some degree. This is known as refraction.
If water has sugar dissolved in it the light will be refracted more than if it were simply distilled water. This is how the refractometer works.
There are different generations of refractometers, the older ones require the user to hold the sample up to natural light in order to get a reading whereas more advanced models use an internal light to calculate the refraction.
How is it measured?
In brewing, refraction is measured in “Brix” (°BX ). 1 °BX is the equivalent of 1 gram (0.035 OZ) of sucrose in 100 grams (3.52 OZ) of solution and is actually measuring its mass. We can then use this scale to measure the specific gravity of the liquid. It’s widely used in the winemaking sector. Other refractometers use the Refractive Index (RI).
The issue is that with all but the most expensive refractometers, you need to convert the °BX or RI into Specific Gravity or Plato Scale because the wort doesn’t act as basic sugar water does.
Also, as the wort slowly ferments into beer as ethanol is produced, it affects the calculations further. However, nowadays there are apps and an online calculator to figure out the true gravity of your sample.
Make sure that you take an accurate Original Gravity as this is a vital measurement to help you use a refractometer accurately. Many home brewers use refractometers in unison with hydrometers to get a really accurate OG and FG.
One big advantage of using a refractometer is that you don’t need as big a sample of wort as the device doesn’t need to float in it. All you need to do is to put a few drops on most digital refractometers and it can calculate the density.
Saccharometer
This is very like a hydrometer in appearance but rather than measuring the density of the liquid it is used to calculate the amount of sugar in the liquid. It works by using the principle of buoyancy. Sugar water is denser and therefore the stem of the Saccharometer is going to float higher or lower depending on the quantity of sugar in the sample.
It is more commonly used in winemaking than beer production however you could also use a Saccharometer to calculate the sugar content of your fermented beer and therefore its ABV.
Where to buy a hydrometer?
Hydrometers are generally inexpensive and it can be a good idea to have one or two to hand in case of breakage (you really don’t want to be rushing out to a shop at a crucial brewing stage).
All good local brew shops will carry these instruments as they are an extremely helpful tool for all home brewers.
If you would like to see my suggestions and where you can shop for them online then please go over to my recommended gear page and find the full review for hydrometers and refractometers.