
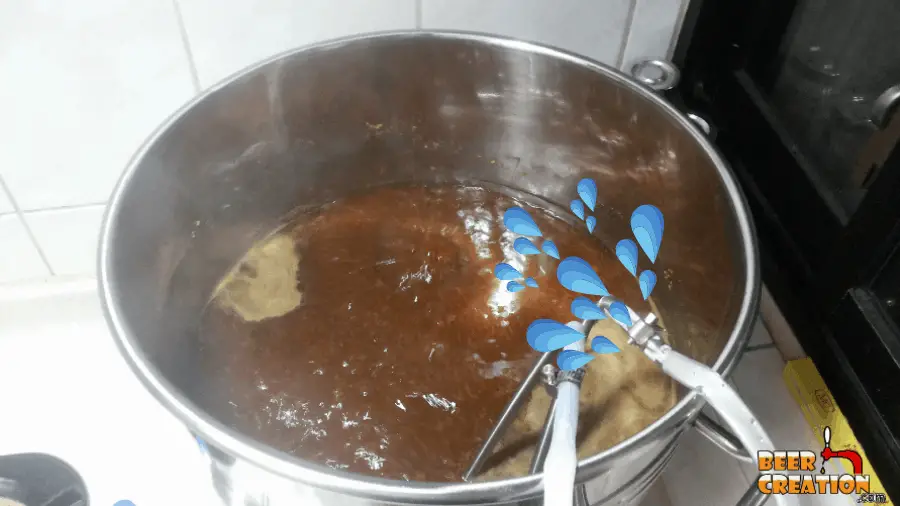
The first time I used my wort chiller I felt like a brewing god. There I was cooling down my wort like a pro!
Then all of a sudden I saw a growing trickle of water coming from the cold side of my immersion wort chiller. It soon starting spurting great torrents of water into my cooling wort.
So, should I have been worried or not?
In most cases, water leaking into wort from an immersion wort chiller will not cause any ill-effects except to dilute the wort to a certain degree. This can be easily fixed by adding DME. A bacterial infection is also unlikely. But, due to the components used in garden hoses, lead can be introduced.
I know that you are pretty anxious right now because you’ve probably just gone through exactly the same thing I did.
But before you rush off, take a minute to read the rest of this article because it will explain exactly what you need to do next.
What to do first
The first thing to do, if you haven’t already done it, is to turn off your water source. This at any rate with make sure that the situation doesn’t get worse.
Be careful
Make sure that you don’t remove the immersion wort chiller from your brew kettle. For one thing, it may still be piping hot if you caught the issue early enough. For another thing, you could actually accidentally disconnect the tubing and pour even more water into your wort.
New to homebrewing? Please feel free to read my ultimate guide to brewing beer at home and where to start.
Finish cooling your wort
If you aren’t able to use any of the suggestions to fix your wort chiller’s seal (see below), you’ll need to cool the wort the old fashioned way.

This can be done by using an ice bath (see my article for more information) or you could even use this opportunity to try the no-chill or overnight cooling method (I’ve also written about that here.)
Is the wort ruined?
In most cases, your wort and finished beer will turn out just fine. However, it may not be exactly to the parameters that you first planned.
Depending on how much water leaked into your wort, you may find that it is significantly diluted. This is especially true if you started off with exactly the right amount of strike water to account for your own personal boil off during the boil.
If, however, you don’t brew to reach your target batch size by the end of the boil, but rather top-up in the fermenter, everything should be fine.
However, there are some ways that this can actually change your beer for the worse.
Dealing with dilution
By adding water, even inadvertently, the concentration of your wort is going to be lower than it was.
Now, you could in theory boil up your wort again and try and reduce it back down to the same specific gravity it was before.
But this is going to be tricky unless you know exactly how much water leaked in and your exact boil off rate.This is also going to muck up other elements of your brew, such as the hop profile.
So a much better way is to simply take a reading with your hydrometer and compare your current Original gravity (OG) with your target OG. Then, you’ll correct it using Dry Malt Extract (DME).
According to Brad Smith of Beersmith.com fame, DME has the potential of an OG of 1.046. And this will come in handy after we do some calculations.

Based on the premise that the numbers after the decimal place represents points, your standard DME packet gives you 46 point (.046) per pound or 46 points per 453 grams.
DME = 46 points/lb (453g)
To use DME to fix diluted wort with a lower OG than planned, you need to first know how many ‘points’ you are down, then add the right quantity of DME. So, let’s look at an example to explain.
Target OG: 1.062
Diluted OG: 1.046
Target OG – Diluted OG X 1000
For our example that gives us: 0.016 or 16 points difference
So to get our diluted OG of 1.046 up to our target OG of 1.062 we need to add 16 points PER Gallon (3.78l).
So, now we calculate for how many gallons our desired batch is, in our example it’s 5 gallons (19l)
Point Difference X target batch size / 46
= lbs of DME
In our example that’s: 16 x 5 = 80
80/46 = 1.73 lbs (784.7g)
If you don’t have any DME handy, you can use ordinary household sugar which has a Points to Pound ratio of 45/1lb (453g)

Ordinary sugar = 45 points/lb (453g)
You can use the same formula as above, but just divide the difference in OG X the batch size by 45 instead of 46.
Risk of bacteria
From the research, I’ve done and the other brewers I’ve consulted, bacterial infection from something like this is very rare. It’s unlikely that tap or garden water is going add anything nasty into your wort.
However, if you have a graywater system where you are using recycled water to cool your wort, the risks may be higher.
If you are at all worried, you can simply bring the wort back up to the boil. However, this will just dilute it that little bit more.
Leaks from hose water
If you have been using a hose connected to your wort chiller than then goes and leaks all into your wort, there could be a greater risk than just off flavors.
Health risks
A garden hose isn’t designed to carry drinkable water and many of the components used wouldn’t pass safety inspection for indoor plumbing.
Among such things as polyvinyl chloride which leach chemicals into water, antimony and bromine (flame retardant chemicals), is lead. Apparently a large majority of hoses in the backyard have higher concentrations of lead, from their components, than is safe for us.
I’m not a doctor and I would recommend you consult one before drinking an at risk beer, but I might say, when in doubt, dump.
Taste risks
Another thing which I heard, especially when this happens with garden hoses, is that there can be a funky taste.
The biggest off-flavor complaint is that the beer smells of band-aids or plastic. This is a clear sign that there is a certain amount of chlorine contained in the wort or beer, which could very likely come from hose water.
Unfortunately, this isn’t an off-flavor that cleans up with storage, so if you can’t stomach it (as it won’t do you any harm), it’s another beer for cleaning the drains.
If you don’t want to chuck away all your beer, even though it’s undrinkable, then check out these 26 ways to use stale or off-flavor beer.
Why does this happen?
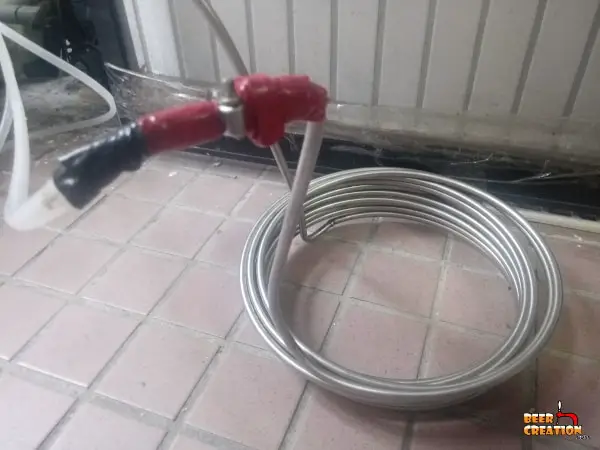
The most common cause of a leaky wort chiller, particularly around the in and out-flows is not tightening the clamps enough. This can be made even worse when you aren’t using the correct size tube.
As a general rule of thumb, if you can get a tube onto your wort chiller without having to heat it up, the tubing I mean, and force it on then it’s more than likely to leak.
An oversize tube can also lead to your actual tube clamps biting too much into the plastic and causing small holes. At least this is what happened to me early on.
How to avoid this in the future?
There are a couple of fixes to this, some of them quick and some of them a little bit more involved.
Be vigilant
This is really a must for all fixes. Most of the time this happens because the brewer was concentrating on something else. Make sure that you are always in the room when cooling wort, especially with an immersion chiller.
But, I’m sure after this experience you were planning to do that anyway!

Tighten up and brew right
As I said, often the biggest cause of this is just that you haven’t tightened your clamps up enough. It’s an easy mistake and can happen as you should really be disconnecting your wort chiller after each brew and cleaning it.
Once you have tightened the clamps, test the wort chiller by turning your taps on full. Ideally, if you can test your wort chiller in hot water, this will simulate how you use it and show if the tubing is expanding or not with the heat.
Double up
Sometimes your single tube clamp just isn’t enough. I’ve found that just by adding a second one about a half-inch along the in-flow port it’ll cut off any leaking entirely.
Again test it under the same conditions to be sure.
Tape it up!
The best short term, and sometimes long term, solution is to make your in-flow port 100% watertight with duct tape.
I’ve done this before when I couldn’t fix the issue any other way and it really does work. However, it’s not easy to remove if you want to easily clean the wort chiller. It’s also perhaps not the best option due to the heat aspect of cooling the wort.
Still, if you can’t follow any of the other suggestions and you really need to continue using your wort chiller TODAY, then this will definitely work.
Glue it together
This is a rather more permanent solution, you simply glue the tube directly onto the wort chiller.
You need to make sure that you use a glue that is both heat and water-resistant, so going for a china and glass cement is the best bet. You can see an example of what I mean here (Link to Amazon).
Use silicone
Another similar option is to use a silicone sealant, but again you need to make sure that it will withstand the initial boiling temperatures and flow of water.
Get out the welder
A much better solution is to actually fix a proper connection to the wort chiller, particularly if you are using a hose so that you can securely screw the hose in each time.
If you have the equipment and skills, or know someone who does, this will be the most effective fix for a particularly troublesome wort chiller.
Upgrade your wort chiller
By far the best way to stop a immersion wort chiller from leaking into your lovely wort is to stop using one.
By ‘upgrading’ to a counterflow or plate chiller, you can actually remove 99% of the risk of water leaking into your wort as these wort chillers are used externally.
In addition, counterflow and plate wort chillers are more efficient that your average immersion chiller, so you’ll be able to cool your wort down even faster!
For more information on the difference between immersion, counterflow and plate wort chillers please have a look at my full article here.
In the meantime, check out my top suggestions for wort chillers below
Recommended wort chillers
Northern Brewer – Silver Serpent

Now, if you still like your immersion chiller design, and they are really convenient let’s face it, why not just get a slightly less risky one.
The Silver Serpent has angled in and out-flow ports which can help reduce the risk of leaking into the wort itself.
You can read more about the current prices and deals on Amazon
Northern Brewer Stainless Steel Counterflow Wort Chiller

Sitting outside your brew kettle, this counterflow wort chiller allows the wort and water to flow against each other in their own tubes meaning ‘never the twain will meet’
It’s efficient, it can be easy to clean if used with the right pump and cleaning solutions and has very little risk of compromised water leaking into your wort.
Again, you can pick this up directly on Amazon for a pretty good price at the moment.
HFS(R) Plate Wort Chiller

Plate wort chillers look compact, but there is a heck of a lot of cooling power in them with almost zero risk of water and wort ever meeting.
They work on the same principles as a counterflow wort chiller and are also used outside the brew kettle, which means you won’t have to worry about leaky tubes like you do with your current immersion wort chiller.
I really like the HFS(R) series, and you can choose from various models to meet your needs. Check out the current stock on Amazon.
