
When I first met my professional brewer friend, Tom, from the Ugly Half microbrewery, I just had to ask “how can I improve my homebrewed beer?”. The immediate response was to better control temperatures, epecially for fermentation and storage.
This is why my first substantial brewing purchase was a chest freezer which can double up as a fermentation chamber and a Keezer.
But it won’t be my last purchase of a chest freezer, because I made a huge mistake, which my wife wouldn’t allow me to fix at the time!
I realized too late that what is written on the box isn’t necessarily what you get when you use a chest freezer, especially for the internal space.
The best size chest freezer for most homebrewers is 7 cu (141 liters) as it gives you the possibility to chill and serve your beer as well as a place to control both fermentation and bottle conditioning. As all of these units come with an in-built shelf, modifying it to increase height is advisable.
Now, that may be very cut and dry but I personally didn’t get a 7 cu chest freezer to start with.
What I intend to do in this article is to give you more of an idea of how big you personally need to go with your chest freezer.
Is bigger always better?
In almost all cases, if you are thinking about getting a chest freezer to use as a fermentation chamber and/or a way to serve chilled beer, go bigger!
Now, I have to just be clear here that until you actually look at a chest freezer with your own eyes and measure it up, you won’t absolutely know its keg capacity. Also, kegs aren’t all the same size either.
Is 5 cubic feet enough?
Most homebrewers opt for a 5 cubic feet (cu)/ (141 liters) chest freezer, often due to price and the modest space it takes up. I did exactly the same thing.

So, for now, let’s talk in general terms, and later on, I’ll talk about easy ways to quickly measure a chest freezer up.
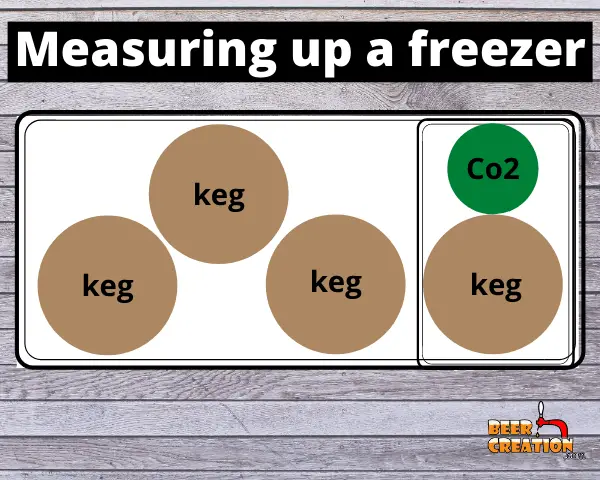
However, due to the design of most chest freezers, a good 20% of the floor space is wasted because of a shelf (or hump). This is to accommodate the freezer’s compressor, and to be honest, is the bane of every homebrewer’s life!
At the end of the day, this means that you can only really fit in two to three 5-gallon (20l) corny kegs and a smaller bottle of CO2 without modification. Even then, you’re probably only looking at 3 to 4 kegs in total.
Buy your brewing ingredients from homebrewing.org and get them delivered to your door!
How about 7 cubic feet?
Going slightly bigger will, you’ve guessed it, give you more space for more kegs. However, like every kid who’s ever played that game with blocks of wood and different shaped holes, you know fitting round kegs into rectangular freezers is tricky.
So, expect to gain only one more keg on the smaller 5 cu chest freezer with or without modification. So, that’s about 3 to 4 kegs when straight out of the box or 4 to 5 if you were to add a collar and increase its height. More on this later.
Should you go even larger?
In my experience, most homebrewers will be limited to the average size of a 7 cu chest freezer. However, if you have a bigger space, then by all means go bigger.
As we’ll cover later on, a chest freezer can be used as a place to perform perfect fermentation under complete temperature control. It can also be used for cold crashing beer as well as chilling it for drinking. I’ve also used one to help keep the right temperature while bottle conditioning my beer. (see my article for more details)
The only thing is, you can’t always do all of these things at the same time. So having two or more chest freezers may be better than one larger freezer. Then again, if you produce a lot of beer and want to have a wide selection on tap, then a much bigger Keezer is needed.
New to homebrewing? Please feel free to read my ultimate guide to brewing beer at home and where to start.

How to get the right size chest freezer
If you are in the market to buy a chest freezer, especially if you want to order one online, it can be hard to visualize how many kegs you might get in it.
I was certainly burned with my first chest freezer purchase. Although I knew it would come with a shelf in it, I didn’t realize just how large it was going to be. There were no specs I could find and as I bought it online, I was left wishing I’d gone just a little bit bigger.
So, if you are able to go to the store to scout out your freezer (even if you actually buy it online later) then make sure you go armed with some cut-outs.
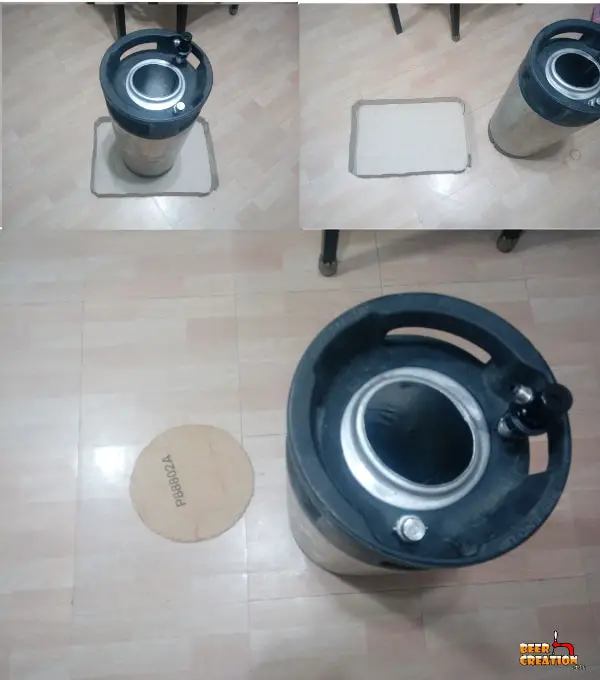
What I mean by that is to get some handy measurements of your kegs by placing them on a piece of cardboard, drawing around the bottom, and cutting the template out. Make 5 or 6 of these cut-outs and take them to the store.
You may feel self-conscious walking into your local home appliance store with circles of cardboard tucked under your arm, but when you have to choose between different models of freezers, you’ll be glad you did.
Place the cut-outs into the bottom of the chest freezer and see how many it will take. Don’t forget to try the shelf area too, but remember when measuring the height with a tape measure (by the way, take a tape measure with you) add a couple of extra inches for the gas and liquid outlet (and airlock for fermentation).
You guessed it, I made that mistake too!
Rough guide Keg size
Type | Capacity (gallon/liter) | Height (inches/cm) | Diameter (inches/cm) |
|---|---|---|---|
Mini keg | 1.32 / 4.9 | 9 ⅞ / 25 | 6 ¾ / 17 |
Cornelius Keg | 5.0 / 19 | 23 / 58.42 | 9 / 23 |
Sixth Barrel | 5.16 / 19.5 | 23 ⅜ / 59.42 | 9 ¼ / 23.6 |
Quarter Barrel | 7.75 / 29 | 13 ⅞ / 35 | 16 ⅛ / 41 |
Slim Quarter | 7.75 / 29 | 23 ⅜ / 59.42 | 11 ⅛ / 28.5 |
Half Barrel | 15.5 / 58 | 23 ⅜ / 59.42 | 16 ⅛ / 41 |
Rubber Barrel | 7.75 / 29 | 13 ⅞ / 35 | 17 / 43 |
Rubber Barrel | 7.75 / 29 | 13 ⅞ / 35 | 17 / 43 |
How Many Kegs Can I Fit In My Chest Freezer?
Below is a quick reference guide adapted from a wonderful resource provided by thadius856. It gives you an overview of the number of kegs you can fit in various chest freezers.
Please note that “stock” and “modified” refer to whether or not you build a collar to make the freezer taller. Also, I’ve given the capacity as a range ( e.g 2-3) where having a CO2 cylinder inside the Keezer reduces its capacity.
Brand | Model | Capacity (cu) | Ball lock keg (stock) | Ball lock keg (modified) | Pin lock keg (stock) | Pin lock keg (modified) |
|---|---|---|---|---|---|---|
Danby | DCF550W1 | 5 | 4 | 2-3 | 3 | 2 |
GE | FCM5SUWW | 5 | 3 | 2 | 3 | 2 |
Holiday | LCM050LC | 5 | 3 | 2 | 3 | 1 |
Igloo | FRF452 | 5 | 3 | 2 | 2 | 1 |
Danby | DCF700W1 | 7 | 5-6 | 4 | 4 | 3 |
Frigidaire | FF07C3AW1 | 7 | 5-6 | 3 | 5 | 3 |
GE | FCM7SUWW | 7 | 5 | 4 | 4 | 3 |
Holiday | LCM070LC | 7 | 5 | 3-4 | 4 | 3 |
Igloo | FRF472 | 7 | 5 | 3-4 | 4 | 3 |
Kenmore | 18702 | 7 | 6 | 4 | 4 | 3 |
Magic Chef | HKCF7W | 7 | 6 | 5 | 3 | 3 |
Frigidaire | LFF09M5HW | 9 | 7 | 4 | 6 | 4 |
Kenmore | 16922 | 7 | 7 | 4 | 6 | 4 |
If you want even more information on the number of kegs you can get into your Keezer or Kegerator and the exact layout, you can head over to the homebrewtalk.com forum.

Should you actually use a chest freezer?
Now, I absolutely believe that any homebrewer who wants to improve their beer’s quality even a little needs a temperature-controlled unit. But it doesn’t always have to be a chest freezer. In some cases, a refrigerator may be a better choice.
Chest freezers are perfect for all stages of brewing from helping to cool down your wort, to fermentation control, to serving chilled beer. However, due to their ‘top-loading access, they may not work for anyone with a bad back.
Lifting in and out fermenters full of 5 gallons (20l) of wort/beer can really test your back and arm muscles, as can doing the same with kegs.
So, if you suffer from any back injuries, you may find that a refrigerator, which can give you horizontal access, is better. Here you could use a dolly to help you slide rather than lift your beer into the fermentation chamber or for kegging.
This being said, a chest freezer is crucial if you want to get into brewing your own lager as it can get you down to the perfect lagering temperatures more easily than a fridge.
Using a chest freezer for fermentation
Although you may have come to this article researching the kegging stage of brewing, your chest freezer can double up as a fermentation chamber too.
If you aren’t quite sure what that is or if you need one, please read my more in-depth article here.
What I will say here is that going from fermenting my beer in my spare room at room temperature to using a temperature-controlled chest freezer rapidly increased my beer’s quality.
The thing to remember is that yeast is a living organism and it works best at the optimum temperature. This will change from strain to strain and you should always check the instructions on your yeast packet.
The other thing to know is that fermentation is an exothermic reaction meaning that it produces heat. So if your external thermometer in the room is reading at the perfect fermentation temperature, your beer could actually be much, much hotter.
So, when measuring out your chest freezer for your kegs, also consider how many carboys or fermenting buckets you can fit in it too. Not sure which ones are better? Check out my full article on choosing carboys or buckets.
Kegging in a chest freezer
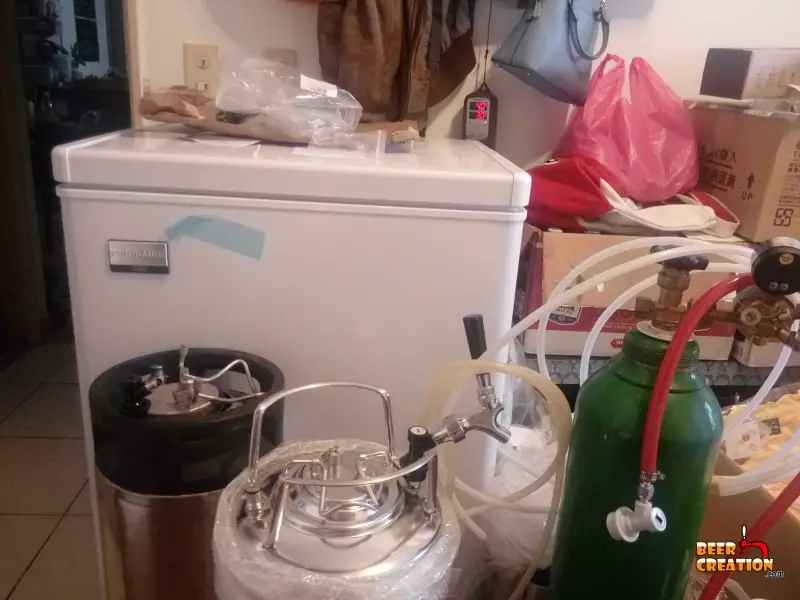
When kegging in a chest freezer, even if you haven’t gone the whole hog and transformed it into a ‘real’ Keezer, you have to remember the CO2 canister.
You can either keep your CO2 inside the chest freezer which will make it easier to connect up in terms of gas tube length etc. You can also leave it on the outside if you want easier access to the gauge.
The point is, what you do today may not be what you always want to do, so make sure you account for the space a CO2 cylinder will take up when choosing your chest freezer.
How to regulate the temperature
Unfortunately, a chest freezer won’t do you much good as a brewer if you just chuck in your kegs and turn it on, unless you like beercicles that is.
So you need some sort of device to maintain the internal temperature of your chest freezer at the level you need. So, you’ll need to get a temperature control device, a heating source, and ideally some way of circulating air.
Inkbird ITC-308

I got my Inkbird ITC-308 from Amazon and couldn’t be happier with it. It’s straightforward to use, reliable, and has made it easy for me to keep the variations in temperature to a minimum.
What you do is plug your chest freezer into the socket marked “cooling” and it will be turned on when the internal temperature, recorded by a thermometer lead, goes above the level you dial in.
A second plug socket is for your heating source.
Ceramic heating lamp

There are many different ways that you can heat your chest freezer up, but I personally like using a ceramic heating lamp, like those used for reptile aquariums.

The one I got works great and the reason why I got it is because it doesn’t emit any UV light. This is important because the beer that is fermented in a glass carboy would be affected by a bright light flicking on and off. Of course, this isn’t an issue if you are just using the chest freezer to chill and serve your beer.
This being said, I would say kit yourself out for both fermentation and kegging. So, I really recommend that you look into getting one of these ceramic heating bulbs either on Amazon here or at your local pet shop.
Another thing you should make sure you get is a lamp with a clip so that you can easily attach it to the inside of the chest freezer. They normally come with a tray that spans the chest freezer, so something like the model shown here will work well.
I also recommend you get yourself a small fan which you can run off inside the chest freezer to help circulate the warm and cold air. This will mean that your chest freezer and heating source have to run for less time, saving energy.
Possible issues with using a chest freezer
Apart from the issues I mentioned before with lifting fermenters or kegs in and out of your chest freezer, there is one other issue in particular which you should be aware of.
It’s something that I actually learned from Denny and Drew from the experimentalbrew.com podcast. They explain that chest freezers weren’t designed to do what we brewers ask of them, run above freezing temperatures.
So, they tend to pick up a lot of moisture inside and that moisture can easily get into the internal parts of some chest freezers. This leads to a big problem with rust and significantly shortens the life of your unit.
So, the guys recommend that you get some silicone sealer from your local hardware store (You can even get it off Amazon you want through this link) and seal up all the joints with lashings of silicone. This should be done as soon as you buy the freezer even before you turn it on.
Do you need to convert your chest freezer?
Although you don’t have to, in most cases it would be more convenient to convert your chest freezer into a true Keezer. What I mean by that is at the very least to build a wooden collar around it.
In order to install most beer taps you’re going to need drill holes and run hoses through walls. This isn’t ideal when working with a standard chest freezer. One hole in the wrong place and it’s good night Vienna (lager).
So, you don’t need to, but I certainly recommend that you either build an external frame to your chest freezer or go the full hog and actually fix a wooden collar to it and refit the lid.
Get a chest freezer delivered to your Door!
In almost all cases I would recommend that you buy your chest freezer brand new, even if you plan to modify it later. This way you can be sure that it works and will continue to work for many years.
Just to get your creative juices flowing, check out some options for chest freezers that you could get delivered right to your door by Amazon!
Hisense HCF07EE8WW00 (7 cu)

Find out more details here
Midea MRC070S0AWW (7 cu)

You can pick up this model here
Danby DCF072A3WDB (7 cu)

These are great chest freezers, check it out here.
