So, you’ve grown tired of the beer making kits you cut your teeth on and you want to brew a home-made beer from a brewing recipe. You have all the equipment but you can’t read the beer recipe and it might cost you a lot of time and money if you get things wrong.
Don’t worry, I’m to explain everything you need to know, and more, in this complete guide to reading beer brewing recipes for your home brewery
How do you read a beer recipe so that you can brew perfect beer?
A beer recipe is split into 4 main parts, the technical brewing instructions, the grain bill, hops bill, & yeast recommendations. The recipe will tell you how long to boil your wort and at which times to add hops. It also tells you your expected gravity readings, IBU, SRM & wort boil temperature.

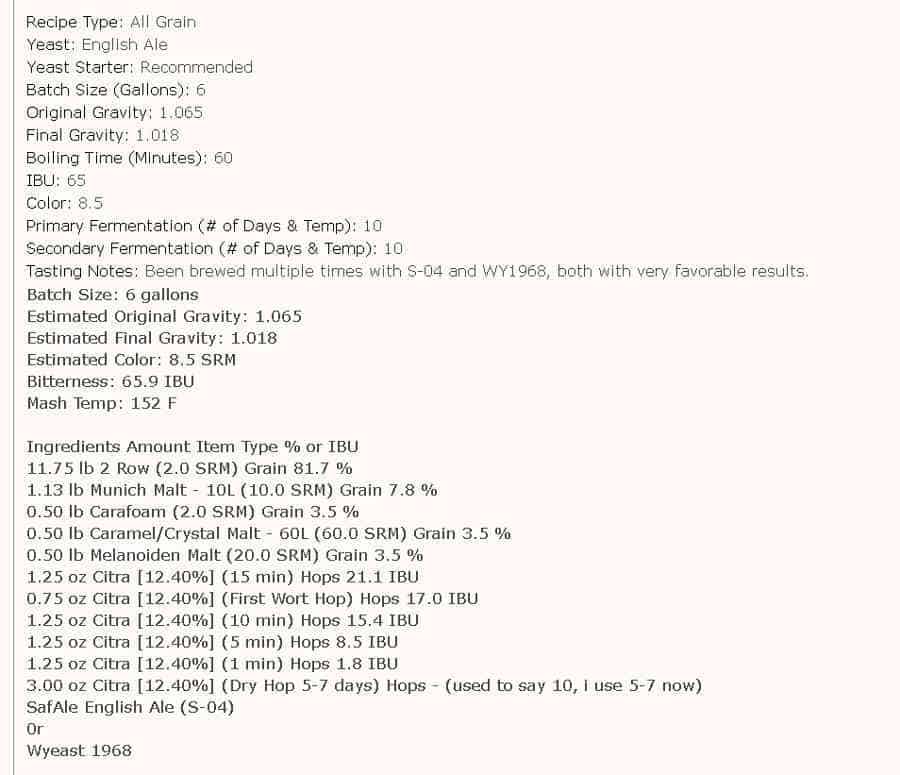
Let’s take the example of a recipe for a Three Floyds Zombie Dust Clone which is provided for us on homebrewtalk.com.
How are instructions on the recipe shown?
The average beer recipe is split into four main parts or functions. They include technical information to help us in the brewing process, the measurement for the malt proportion of the wort, the measurements for the hop proportion of the wort and recommendations for the yeast.
This information is not shown in completely different sections of the recipe and most brewers use a form of shorthand which isn’t easy to understand if you are new to brewing.
In short, the recipe tells us the quantity of grain and hops we need, which yeast we should use and exactly how much beer we can produce and at what alcoholic strength.
What are the technical brewing instructions shown in beer recipes?
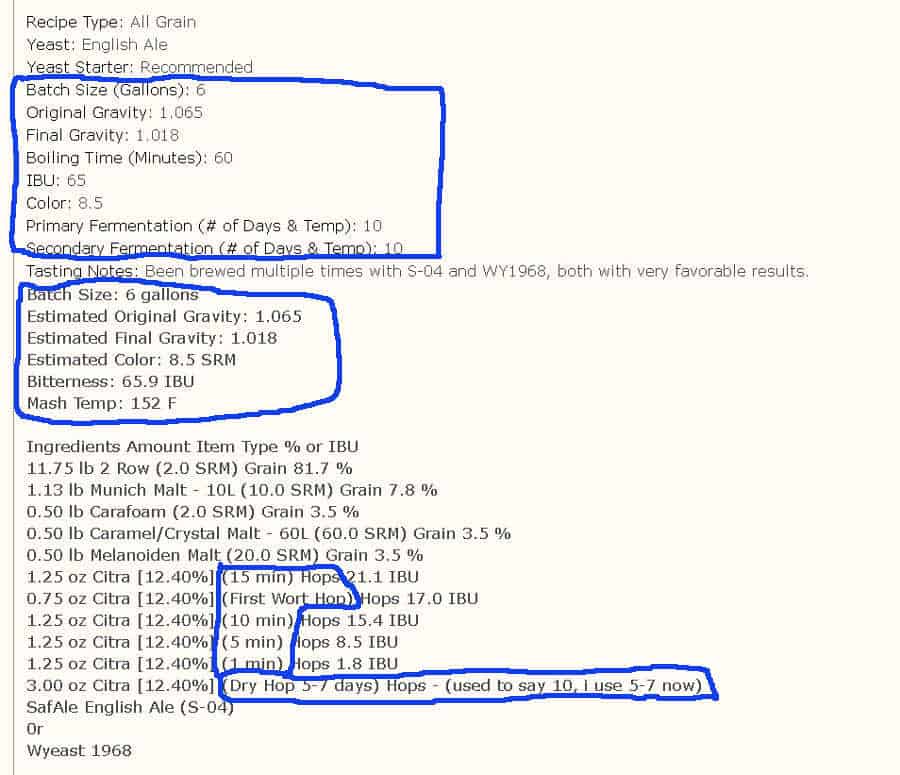
There are several pieces of vital information that we can learn from a home-brew beer recipe which will help us make the beer in the right way. Apart from the ingredients, which I’ll come to later, we are told several things in our Three Floyds Zombie Dust Clone recipe including the batch size, the mash temperature, the boil time, the fermentation duration, = expected OG and FG, SRM, IBU, and the schedule for adding hops including a dry-hopping option. (note: in this example, some of this information is provided twice).
What’s the batch size in a beer recipe?
In our recipe, the batch size is 6 Gallons (US).

The batch size refers to the expected potential yield of the brewing process for the particular recipe you are following (though some debate this definition). Most brewing calculators and brewing software will compensate for the loss of water through evaporation when giving you the initial quantity to begin the brew with. Remember that the right amount of liquid can be determined by the OG prior to the boiling phase.
(shop for your brewing ingredients on homebrewing.org).
What’s the mash temperature in a beer recipe?
In our recipe, the mash temperature is 152 °F.
The mash is a process where brewers steep grains, such as barley, in water in order to activate the malt enzymes which occur naturally within them. This converts the grain starches into fermentable sugars which can be transformed by yeast into alcohol and CO2 during the fermentation phase. In order to release enough sugars, the wort needs to be maintained at the right temperature during the mashing stage, in this case, 152 °F.
In order to have the correct temperature during the mash you need to heat your strike water (which is poured on the grain) to a higher temperature. It will cool down as it’s density changes with the addition of material into it. In this case we would aim for about 162 °F for our strike water.
Remember that not every recipe involves mashing as those that utilize malt extract eliminate the need to mash any grains before the boil.
What’s the boil time in a beer recipe?
In our recipe, the boil time is 60 minutes.
After mashing the grains (if required), the wort is usually transferred into another vessel called a kettle where it is heated while hops are added at regulated intervals.
The boil time begins when the surface of the wort is clearly bubbling and should be recorded from the moment as accurately as is possible. Remember that the wort will boil at a temperature higher than 212 °F (100°C) as it is denser than water.
The temperature that it will boil at will also be determined at the elevation above sea level that you are working at. As a general rule, rely on visual indications that boiling is taking place and DO NOT leave your wort during this process even to answer the front door!

Shop for your hops online at homebrewing.org.
What does OG mean in a beer recipe?
In our recipe, the OG is 1.065
OG stands for Original Gravity and is a measurement of the specific gravity, or density, of your wort after you boil it and before you pitch it with yeast. The OG is usually taken from the wort when it is in the fermenter just before fermentation takes place. The easiest way to measure density in liquids is with a hydrometer.
If your OG is not what you expected or you don’t know how to determine your OG, then please check out my article on the topic where I go into much more detail.
What does FG mean in a beer recipe?
In our recipe, the FG is 1.018.
FG, just like OG, refers to the Final Gravity of your brew but this time it is the density of beer. You measure your FG after fermentation has taken place and this means that you can now officially call your wort beer.
FG tells you if the yeast has successfully transformed the sugars present in your wort into tasty beer juice and to the expected amount. If you find that your FG is very different to the expected level, then you may have had an issue with your fermentation process. If you suspect this is the case, then please look at my article on troubleshooting fermentation issues, it can really save you some headaches.
What’s does SRM mean in a beer recipe?
In our recipe, the estimated SRM is 8.5.
SRM refers to the color your finished beer will have and this is estimated from the ingredient you include in the wort. In many modern pieces of software, you will even be given the exact color when you enter your grain and hops bills.
What’s the IBU in a beer recipe?
In our recipe, the IBU is 65.9. (quite bitter)

The IBU refers to International Bitterness Units and is calculated by the IBU reading from all the ingredients which are included in the wort.
Although this is a good guide it doesn’t always tell us exactly how the beer will taste. If the beer is balanced well between malts and hops it can have a high IBU reading but not a very bitter taste.
A brewer can control the bitterness of the beer they make by the way they add hops to the wort during the boil and fermentation processes.
When do I add hops in brewing process?
In our recipe, the hops need to be added from the beginning of the boil and then at 15 minutes,10 minutes, 5 minutes and 1 minute before the full boil time of 60 minutes.
By adding hops to the boiling hops at different periods during the process, the brewer can control the flavor and aroma they gain from the ingredient. This is often the most confusing part of the recipe for newbies as it is rarely explained in plain English.
Usually, the time for when a certain quantity of hops should be included is shown by minutes in brackets e.g. (15 mins). But this doesn’t mean that you at the hops 15 minutes after the boil begins. In fact, it means you should at them 15 minutes before the boil us due to finish, in our case, it’s a 60 minute boil time. So, at 45 minutes into the boil, we would add the required quantity of hops which is listed with the instruction ‘(15 mins)’.
Where the recipe says ‘(first wort hop)’, this tells us that we should add this quantity of hops as soon as the wort has begun to boil and it will remain in the wort until we take it off the heat.
When do I need to dry hop beer?
In our recipe, dry hop from 5 to 7 days.
Dry-hopping has become increasingly popular in the brewing community in recent years. It enables you to improve the taste and smell of a beer without having to trade off with increased bitterness from the alpha acids in the hops.
When we have pitched our wort and the fermentation period is well and truly started we want to add the required amount of hops and ‘dry hop’ the wort for 5 to 7 days. Basically, put the hops into the wort and allow them to soak for the period indicated where they will help improve the aroma and flavor of your beer.
If you are fermenting only in one container, rather than transferring to a second, you can pretty much leave those hops in until you rack your beer. There won’t be too many adverse effects and it may be worse in terms of the risk of bacterial infection if you were to try and fish the hops out.
How long should you allow your beer to ferment?
In our recipe, the Primary Fermentation and Secondary Fermentation are both 10 days each.
Fermentation is the process in which your yeast transforms the sugars, which were released into the wort during the mashing phase, into alcohol and CO2. It’s what makes beer the drink we love and cherish.
In the example recipe we have, it mentions secondary fermentation which would mean transferring your fermented beer into a second, usually glass, fermenter to age it further. There are some benefits to this but the practice is slowly falling out favor with most brewers because of the extra time and risk of developing off-flavors.
So, as a general rule of thumb, you can leave your wort fermenting in your primary fermenter for the indicated amount of time (10 days) plus half to three-quarters of the time indicated for the secondary fermentation (5 to 7 days)
How to understand your recipe’s ingredients
Not only does the recipe tell you how to make your beer, it also tells you what to put in it and some other key pieces of information.
Main ingredients: Grain (for all-grain recipes otherwise dry or liquid extract), hops, and yeast.
It’s important to get the proportions of these ingredients correct and also to use the right ingredients, otherwise, you will not brew the beer you were hoping for. But again, veteran brewers use terms and codes in the recipe which are not very clear to the newer brewer.
What is the grain bill?
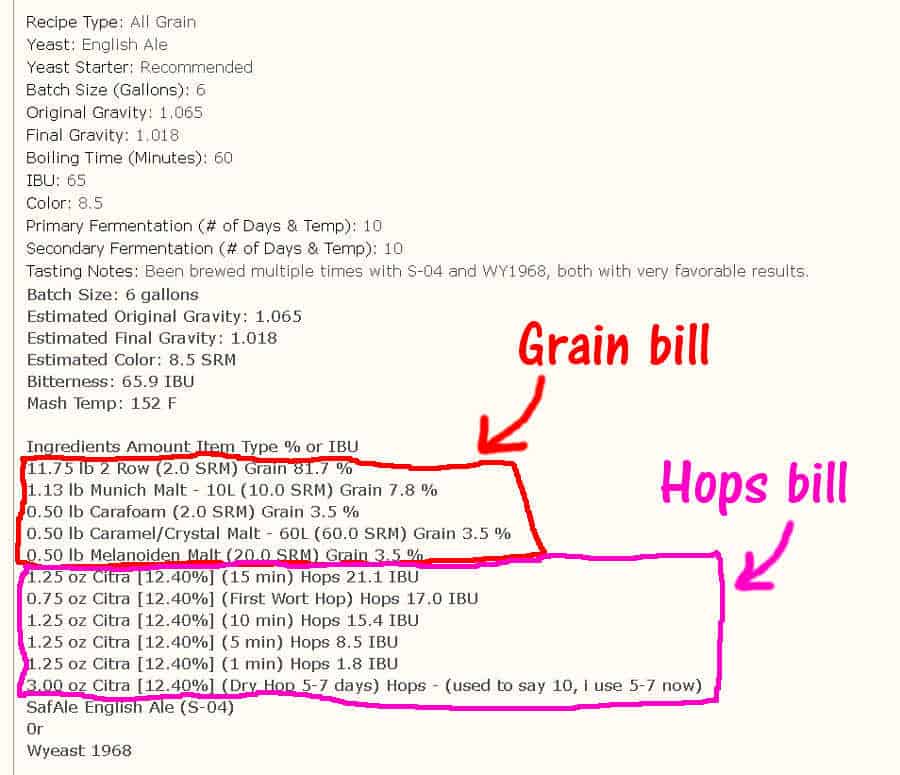
The grain bill, in an all-grain recipe, refers to the various quantities of grain which will be used in the mashing process to produce the wort used in subsequence phases of brewing.
In our recipe the grain bill is as follow:

11.75 lb 2 Row (2.0 SRM) Grain 81.7 %
1.13 lb Munich Malt – 10L (10.0 SRM) Grain 7.8 %
0.50 lb Carafoam (2.0 SRM) Grain 3.5 %
0.50 lb Caramel/Crystal Malt – 60L (60.0 SRM) Grain 3.5 %
0.50 lb Melanoiden Malt (20.0 SRM) Grain 3.5 %
This means that we need a grain that has a 2-row kernel structure and has a color rating of 2.0 (SRM = Standard Reference Method), 81.7% means that this quantity of our grain bill is eighty-one point seven percent of the total grain used. So, in this case, we need 11.75 pounds of the 2-row grain.
When referring to Munich malt and the caramel/crystal malt, the recipe states we need 10L of the former and 60L of the latter. This isn’t a measurement of quantity but actually stands for Lovibond and is a measurement of the color of the grain.
Are Lovibond and SRM the same then? Well, almost. The difference in the catergorization of color is very close. However, generally, brewers measure the color of grain in °L and the color of the finished beer in SRM.
See my article on key brewing phrases you should know here.
However, you just aren’t able to get the right grain every time. Some countries don’t have access to the grain varieties used by brewers in other countries. So a good tip is to use a grain substitution chart in order to find the closest match. This will ensure that even if your beer isn’t exactly the same as the maker of the recipe designed, it’ll be a close example of it.
What is the hops bill?
Just like the grain bill, the hops bill refers to the quantity and variety of hops to be used in a beer.
In our example the hops bill is:
1.25 oz Citra [12.40%] (15 min) Hops 21.1 IBU
0.75 oz Citra [12.40%] (First Wort Hop) Hops 17.0 IBU
1.25 oz Citra [12.40%] (10 min) Hops 15.4 IBU
1.25 oz Citra [12.40%] (5 min) Hops 8.5 IBU
1.25 oz Citra [12.40%] (1 min) Hops 1.8 IBU
3.00 oz Citra [12.40%] (Dry Hop 5-7 days) Hops
This tells us that we need, for example, 1.25 ounces of Citra hops which has an alpha acid level of 12.40% and will develop a bitterness level of 21.1 (IBU).
As previously discussed, the hops bill is where we also learn at what stage in the boiling phase we should add the hops. So, we need to begin the boil with 0.75 ounces of Citra hops, again with 12.40% alpha acid which will give the finished beer 17 IBU (adding to the overall bitterness of the beer).
Which Yeast do I need to use?
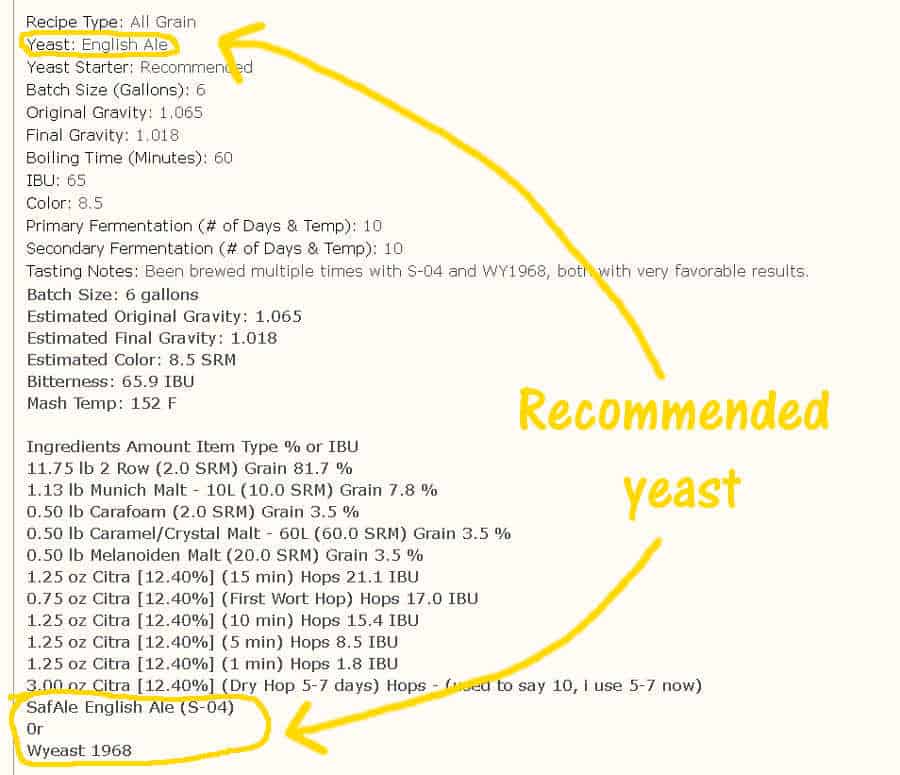
In our recipe, the recommended yeast is SafAle English Ale (S-04) or Wyeast 1968.
Using the right yeast in the recipe you are using is important for many reasons. The efficiency level, or how much sugar will actually be transformed in to ethanol and CO2 is largely dependent on the yeast as is some of the taste and smell a finished beer has.
Often a recipe will give you one or two options on yeast that you can use, so try to find the right one where possible. If it’s not possible, then you can also substitute this ingredient for the closest variety you can find. In this case, any English Ale yeast variety will not be far wrong for the type of beer we want to brew.
Another piece of information that the recipe gives us is that a yeast starter is recommended. This is the addition of sugary extract which is mixed with yeast before being added to the wort before fermentation. I believe this is recommended here because the OG is above 1.050
How to read an extract based recipe
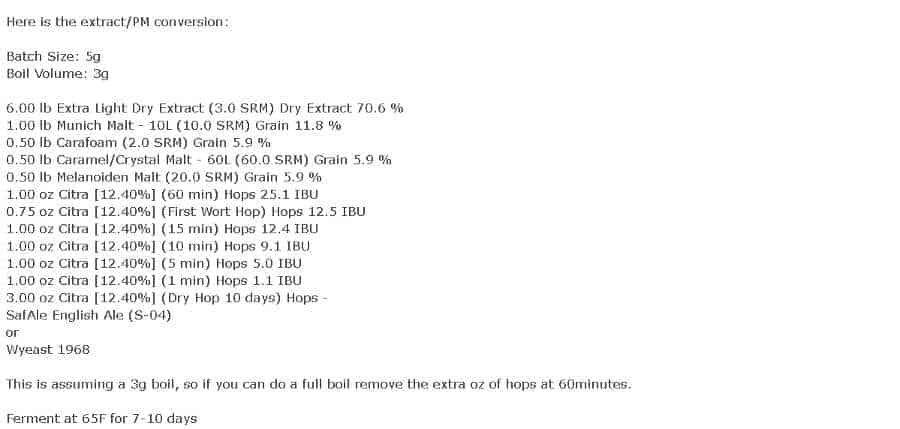
When you use extract, either DME or LME (see definitions here), you don’t need to mash your own grain to release active sugars used in the brewing process. So, as can be seen in the extract version of the Three Floyds Zombie Dust Clone recipe, much of the same ingredients are needed. The major difference is the quantity of the additional malt grains and hops needed.
Compare the all-grain and extract recipes to each other:
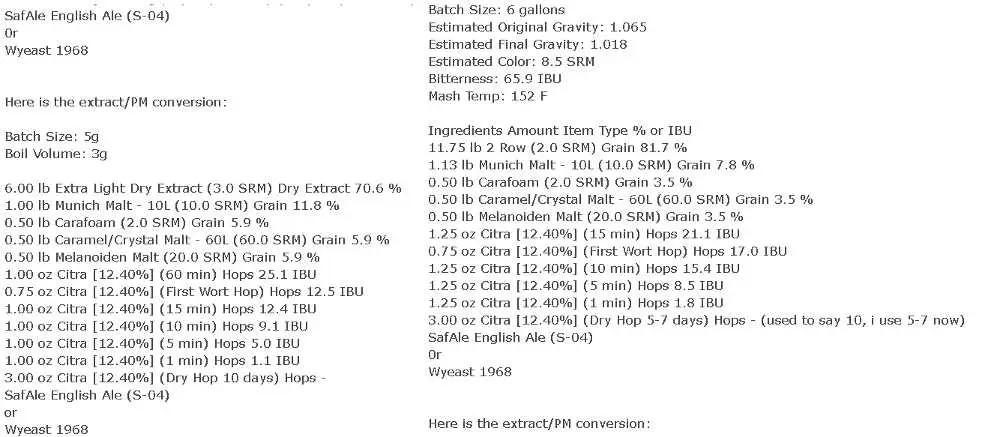
With the addition of 6 pounds of Light Dry Extract, and the exclusion of the 11.75 pounds of 2-row grain, there are only slight changes in the quantities of Munich Malt and the Citra hops is merely added to the wort in slightly different quantities at almost the same timing (with the exception of 1 additional ounce at the very beginning of the boil.
How easy is it to increase/decrease a home-brew batch size from a recipe?
It’s possible that you find the perfect recipe for a beer that you want to try but you don’t want to brew it in the quantity of the original recipe’s yield.
Most recipes are based around a 5-gallon yield, but some people don’t want to have that much beer on their hands or their current equipment isn’t capable of producing so much. On the other hand, you may be planning to brew for a large function such as a wedding or find it more cost-effective to brew in bulk. Whatever the reason may be, as a home-brew you are going to find the process fairly straight forward.
From a home brewing point of view, changing the quantity of your grain and hops bill is fairly easy even if you want to significantly increase or decrease your batch yield. If you were producing beer on a commercial scale, even as a micro-brewery, the story may be different. (buy beer from local breweries)
Scale your brew the easy way
Luckily we live in a period where tools for any hobby are almost limitless. With the right app or web software, you can easily scale your recipe to fit any need you may have.
It is as simple as entering in all the ingredients and then following the instructions to scale the recipe up or down as desired.
Scale by volume (the old fashioned way).
If you just want to understand how the process works or you are just more comfortable with calculating things yourself rather than trusting in new tech, let’s go over how you can do this.
Basically, the amount of ingredient we use in a recipe are in those quantities because they will produce a certain amount of beer with certain characteristics including FG and ABV. So, to increase/decrease the quantities we need to figure out what our desired yield is for the batch of beer we are brewing.
So, for our example, beer, Three Floyds Zombie Dust Clone, the yield is 6 gallons and, for example, with the all-grain version we need 11.75 pounds of 2-row grain. So, if we wanted to make double that amount of beer, we just need to double all the quantities. However, if I wanted to make 100 gallons (a big wedding perhaps?) that’s not so easy to do the arithmetic in your head.
What we need to do is to divide the quantity by the original yield and then multiply that by the desired yield.
11.75 lb / 6 = 1.95 * 100 = 195.83 lb of 2-row grain
If we want to go the other way and instead of making 6 gallons we need to make 4.5 gallons, we just do the same thing.
11.75 lb / 6 = 1.95 * 4.5 = 8.81 lb of 2-row grain.
Just by doing the same sum with each ingredient you will be able to easily and accurate scale your quantities up or down as you need them. If you do this on a relatively small scale there will be no adverse effects on your final product.
Closing thoughts
I hope that you have found this article helpful and that you now feel more confident to work with any recipe you find on the web or in beer brewing books.
If you have enjoyed reading this guide to understanding beer recipes then please share it with your friends and online community so that I can help as many people as I can to brew the best beer that they can.
Thanks, and happy brewing!