
Brewing beer has been an important pastime for humanity for the last 5,000 years. Not much has really changed in that time, until now! BIAB is part of a 20th (and 21st) century revolution in homebrewing, so it’s important to pay attention.
So, What is BIAB brewing?
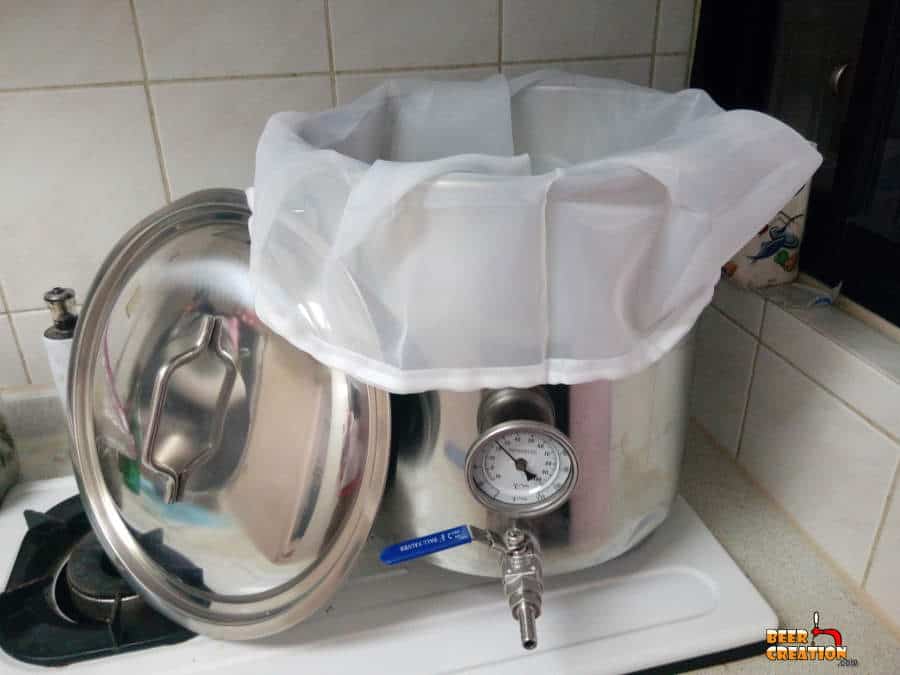
BIAB is a method that irradicates several steps in traditional brewing, including lautering & transferring wort from a mash tun to a kettle. As in all-grain brewing, grains are mashed to release sugar, but this is done within a brewer’s bag directly in the kettle which is used for boiling the wort.
The BIAB method is a godsend to almost every brewer who tries it and has several benefits on brew day. In this article, I’m going to go through everything you should know about the BIAB process and hopefully convince you to try it for yourself!
What does BIAB stand for?
BIAB simply means “Brew In A Bag” because the mashing process and traditional lautering stage are all conducted by using a permeable bag while using the same vessel for every step. Not to be confused with ‘Boil In A Bag’ which you may be familiar with if you ever served in the armed forces or were a boy scout in the UK!
What do I need for BIAB?
The beauty of the BIAB system is that it eliminates the independent mashing and lautering processes in traditional all-grain brewing. So, instead of having multiple vessels for specific tasks, those actions are carried out in the same container. So, you need a lot less than you all-grain brewing neighbor next door.
What you’ll need:
- A brew kettle
- a permeable brewer’s bag
- a pully system for lifting (or variant)
- something else to do in the afternoon, it’s that quick!
But seriously, the only kit you really need is a bag to mash the grains in, some way to hoist the bag out after mashing (even grain for 5-gallons of beer can be heavy) and a kettle large enough to boil up your wort. On top of that, you’ll need your ingredients which will only slightly need adjusting for this brewing method.

Other things to consider
Although the BIAB method is perfect for those with limited space to brew in, you do need to remember that you’ll have to lift the bag out of the mash tun/kettle before you boil it. So, always make sure you are brewing in a place with enough verticle room for you to do that and somewhere where you could hang or rest the bag over the kettle in some way for it to drip the remaining wort back into it.
Choosing your BIAB equipment
For all my recommended brewing gear check out my recommended gear page with the best equipment that the brewing community has voted on.

The right BIAB kettle
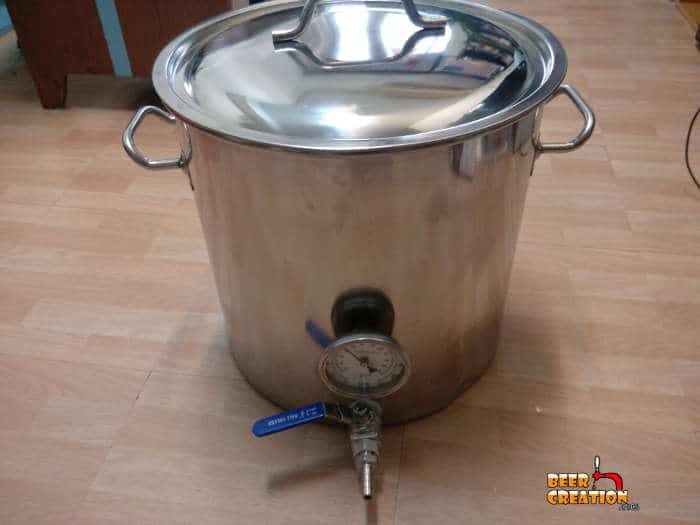
In fact, the vessel you use in the BIAB method doubles up as your mash tun, lautering tun and brew kettle all in one. Whereas with other brewing methods you perform each subsequent stage with various quantities of water, it’s not the same with BIAB. You’ll need a pot that is capable of taking the full complement of water needed for mashing, lautering, and boiling. So, for a 10-gallon yield, this could be in excess of 13 gallons of liquid (depending on certain factors). So if you only have a 10-gallon brew kettle to play with, you may only be able to brew smaller quantities of beer.
Choosing your BIAB bag
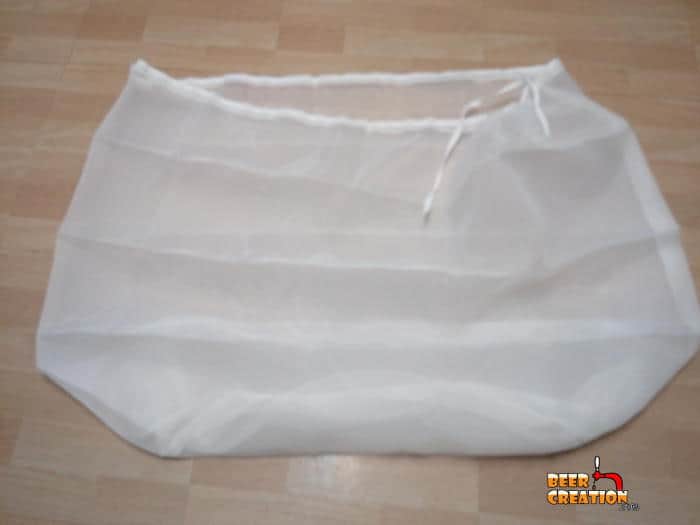
Brew bags are fairly inexpensive and this is part of the attractiveness of the technique. You can also make your own (or someone you know who’s good at needlework) from voile or a similar material. The main concern is that the bag you buy or make is both strong and finely meshed. It needs to be able to take the weight of the grain when lifted above the kettle for dripping as well as permeable enough for smaller compounds to pass through without littering your wort with grain particles.
Lifting the bag
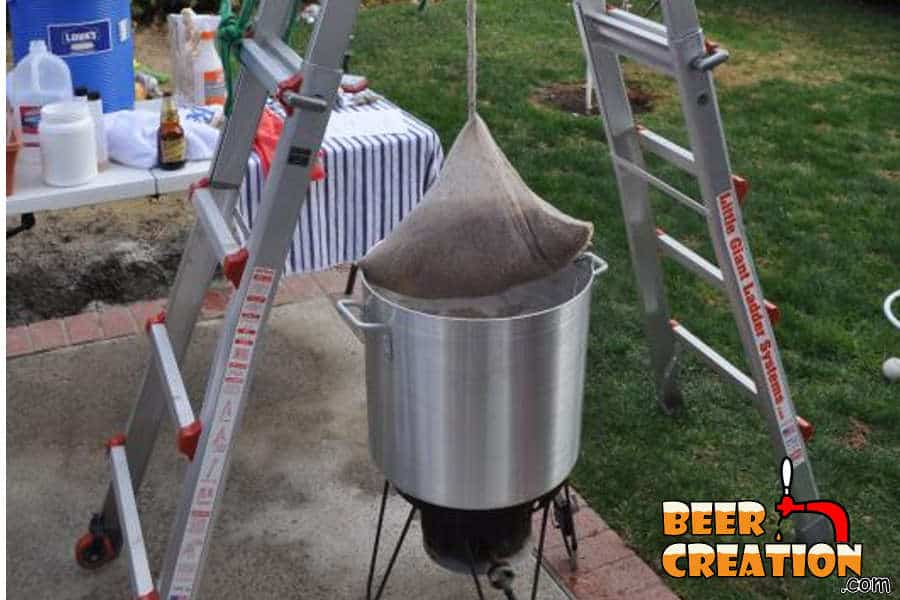
This is the most crucial part of the BIAB method and why it’s gained such popularity. By simply removing the grains directly from the ‘mash tun’ you instantly propel your brew into the next phase which is boiling.
The way you lift the grain bag depends on your brewery, setup and the weight of the bag. The main goal is to allow your grain to completely leave the wort in the kettle while letting any remaining sugary wort to drip into the container. It’s also important that you don’t hurt your drinking arm, because otherwise, this entire process would be a waste of time and energy.
Use a strainer or colander which fits over the top of your brew kettle (with enough clearance above the surface of the wort) and place the grain bag on this. It’s really a two-person job, but even with very heavy grain bags you just need to hold the wait long enough for someone to slip the strainer onto the top of the pot. This is a good option for smaller batches as there is less volume and weight to deal with.
Using a pully system is essential if you are brewing larger batches, even ones with a 5-gallon yield. Suspending or resting the grain bag on something is a must because even Arnie couldn’t hold up a hot bag of grain for the time it needs to completely empty itself of sugary wort.
Most brewer’s bags come with a pull string system for closing them, and you can use this to attach a rope to the bag for hoisting. Alternatively, you can sew in a parachute cord so that it’s easier to put up the bag later.
Using a crane/hoist or building a frame is the best ways to easily suspend your bag over the kettle below. If you have the money to invest, or even if you have one lying around the garage, a conventional automobile hoist (or crane), which you can check out on Amazon, used for winching up engines is a great option for homebrewing. You can use rotating engine stands (Amazon) for smaller batches or even install a ceiling hoist (Amazon) in your garage. Alternatively, you can build something yourself.
Just make sure that in either case, the device can hold the weight and also that you can get enough clearance above the surface of the wort (those bags can get pretty big!). Using a conventional ladder (see image above) is also a fairly low-tech solution if you want to take that avenue.
Top Tip: Always do a trial run with any equipment before you actually use it in during your brew day. The same is for your hoisting equipment, especially if you have built it yourself. Don’t forget that even after mashing the grain is going to be quite warm and you don’t want any unnecessary accidents.

Calculate the total weight of your grain by including the absorption rate of said gain (0.1-0.125 gallons per pound of grain is about right). So, 10 pounds of grain will absorb 1 gallon of wort (10 *0.1 = 1) and 1 gallon of the wort has a mass of roughly 8.34 pounds (1 gallon = 3.7854 kg(water) = 8.34 pounds). So, that 10 pounds of grain will actually weigh 18.34 pounds when you try and pull it out of the wort after mashing.
If you are using commercial equipment then you will have a clear indication of the maximum weight it can handle and it’s often going to be more than you need, but always stress-test your own DIY projects and make sure that you can brew in safety every time!
Advantages and Disadvantages of BIAB Brewing
Let’s face it, if BIAB was the ultimate way to brew beer we wouldn’t even be having this conversation (or am I just talking to myself? Maybe). The point is, BIAB brewing isn’t for everyone but it does still have a lot of benefits for most homebrewers.
Advantages
It saves you time! Because you don’t have to go through the process of lautering you could reduce your brew day by as much as two hours. There is no real need for performing a Vorlauf as you don’t need to set up a grain bed through which you’ll pour your sparge water later. You just need to lift your bag out of the wort and let it drip into the kettle. It’ll take a fraction of the time!
Less equipment to buy! Just as with an extract kit or recipe, you need a heck of a lot less equipment that with traditional all-grain recipes. The only additional thing to an extract kit is the brewer’s bag to hold your grain in during mashing. That’s pretty much it.
Saves you money! As you have less to buy, you’ll have to spend less. Brewing is a very expensive hobby if you let yourself get carried away, so if you can get great homemade beer for less money, well that’s just having your cake and drinking it!
Saves on storage space! Again, having less equipment means that you don’t have to stow so much kit away between brew days. If you have a large estate then this isn’t even a concern but if you are brewing in a modest space, not having to store mashing and lautering leads to way fewer arguments with the other half!
An easier process to follow! Although all-grain brewing is a lot of fun and immensely satisfying, it does have its complexities and is very hands-on. BIAB brewing is less so as you avoid all the delicate steps involved in lautering. So, as a next step from the basic extract kits out there on the market, BIAB brewing is less intimidating for new brewers.
Less cleaning! Not only do you have less equipment to deal with the bag itself makes the job of cleaning up after yourself a real doddle! You can simply lift out most of the organic matter, the grains, from the wort during the pre-boil phase which makes the job of cleaning out your kettle much easier later. In all-grain brewing, you’d have to deal with cleaning out a grain bed from the false bottom of your mash tun, which is just extra time and effort you don’t necessarily need on your day off!
Disadvantages
I can’nae brew nae more, Captain! With BIAB brewing you are really limited to the capacity of the kettle you are mashing and boiling your wort in. As you use the full complement of the pre-boil yield of water for the wort from the get-go, you need a pot that’s big enough for the job. unlike with other methods of brewing, topping up with water after mashing or even boiling the wort isn’t really an option with BIAB.

Don’t Vorlauf me! Traditionally in the BIAB method, the process of recirculation isn’t performed and many all-grain brewers see this as a mistake. The entire goal of mashing is to extract as much fermentable sugar from the grain as possible and the Vorlauf is a key step in doing this in other methods of brewing but is very difficult to achieve with BIAB.
One mash thickness fits all! Choosing the ratio of grains to water allows the brewer to both concentrate their beer, produce wort in smaller quantities to be topped up later in the process and also control flow rate during lautering. With BIAB, due to the bag itself, it’s difficult to wander out of the prescribed lines of mash thickness for the process. Too thick and too much water will be sucked up by the grains never to be seen again. Too thin, and you’ll never extract enough sugar for fermentation. It’s just a question of a reduction in flexibility that some brewers don’t appreciate.
Quicker but less efficient! Because of the lack of traditional lautering as done with conventional all-grain brewing, many people claim that efficiency suffers. This is referring to the ability to extract as much sugar from the grain as possible with the system and recipe you are using. As BIAB brewers don’t usually rinse out the grain, they are said to leave a lot of sugar in the bag.
Cloudy Beer! Another claim which is often stated is that BIAB beer is cloudier than conventional all-grain beer because of all the additional grain particles which escape into the wort. Lautering gets rid of a lot of the free-flowing particles in a bagless all-grain brew, and there may be some grounds in this claim. However, if you use both a thinly meshed brewing bag and a decent strainer, you can get the same results as lautering.
Grain absorption sucks! This is more of a concern for Brew In A Bag brewers than perhaps all-grain brewers simply because the latter can rinse out the grain with more water. If the grain sucks up too much water, then it’s going to really affect the density of the wort and mess up all the calculations made for the original recipe. So, this is something that needs to be factored in so that you can hit your target OG before pitching your wort.
Do you work out? I suppose this could be considered a disadvantage, but it’s just the physical side of BIAB brewing. If you haven’t got your brewery set up properly then you may have to do some heavy lifting. Pounds of grain full of liquid can weigh a lot, so trying to do things manually while working with hot liquid isn’t ideal.
The next few ideas are really just issues that face any brewer who is migrating from extract brewing to any form of all-grain brewing.
Water troubles! When you make the transition from extract brewing to all-grain brewing, you need to be concerned a lot more about your water quality and chemical balance. Getting the right PH level and ensuring that things like chloride compounds are absent while calcium molecules are present becomes more important and is an added headache.
Temperature concerns! When mashing you need to be able to get the temperature just right so that you can encourage the naturally present enzymes in the grain to convert starch into sugar, too cold and it won’t work, too hot and they will knock off work. It’s just something extra to think about and can increase your brew day workload.
Variations on traditional BIAB method
If you want the best of both worlds, BIAB ease, and all-grain efficiency, you can set up a system that uses a fine mesh to filter out the grain as it is being racked into a second container.
This is an idea I discussed with another brewer and involves mashing in a regular beer cooler box and then pour the wort through a bag-filter into the brew kettle. It has the advantage of using an isothermic container for mashing while still reducing the need for a full lauter as well as having to manually lift a hot and heavy grain-filled bag.
How do you sparge with BIAB?
Well, many brewers would simply say that you don’t sparge when using the BIAB method as you don’t need too, still, others disagree. I’ve written a more in-depth answer to this question in another article if you want to learn more, but I’ll go over the salient points here too.
It’s ok to squeeze your bag! You may have heard that this was a big no-no, but trying to extract as much wort out of the bag once you’ve hoisted it out of your kettle is absolutely fine! There is a persistent myth that this is going to make your beer taste nasty, but there doesn’t seem much empirical evidence for that.
Try Dunk sparging to get even more fermentable sugar out of the grain by literally placing it in more hot water for a quarter of an hour or so. This is ideal if you have underestimated how much water you need and you actually want to top up your pre-boil wort quantity.
Alternatively, pour some additional hot water over the grain bag to simulate the effects of fly sparging. This can actually up your efficiency to a fairly good percentage but again it’s only really recommended if you haven’t really got enough wort for the boil. Too much extra water is going to through your target numbers off and so affect the final quality of the beer.
How much water does a 5-gallon BIAB need?
I suppose the stupid answer you’d get is ‘5 gallons’ and this would actually be way off. There is a fair bit to calculate for here and many factors to consider.
If you are interested in learning more about how much water is used in various stages of both BIAB and conventional extract or all-grain brewing, check out my dedicated article on this topic right here.
A ballpark figure would be between 6 and 7.5 gallons of water for a BIAB brew day with a target yield of 5 gallons. This would have to account for the evaporation loss during boiling as well as the absorption rate of the grains being used and loss of wort in the trub or through racking. Knowing your equipment’s efficiency in certain areas is really going to give you the definitive answer, but it is true that BIAB brewing requires you to calculate liquid loss a little more thoroughly than other methods of brewing.
Once you have all the details collected and recorded, you can use a BIAB calculator online or in an APP to get the exact amount of water you’ll need for your recipe and set up.
Summary
The BIAB method is a great stepping stone from the less intensive process of extract-based brewing to the more in-depth task of all-grain brewing. The fact that it’s relatively much cheaper than full-blown all-grain brewing and that many of the laborious tasks are eliminated makes it an excellent choice for most.

As with most things in life, the drawback of BIAB brewing can be overcome by simply planning ahead and making sure that some key ideas are clear in your mind before you start your brew day.
Remember to keep yourself safe from injury by not underestimating the strength it takes to remove the grain from the kettle and always asked for a helping hand whenever possible. Above all else, enjoy the journey!
Happy BIAB brewing!