
There are many things about brewing that make me giggle, and the term ‘blow off’ is absolutely one of them. In British English, it’s a cute way to say fart, but it’s actually something less hilarious and much more important in home brewing.
So as a brewer, what do I mean by a blow off tube or valve?
A blow off tube is a sanitized line for CO2 to leave a fermenter. In the initial stages of fermentation after pitching your wort with yeast, the creation of CO2 can be very violent. The headspace is quickly filled with gas & foam. So, if the pressure isn’t released safetly an explosion could occur.
Although the concept may be fairly easy to understand, not setting up a blow off tube correctly can lead to many different problems with your beer later.
In this article, I have collected up everything you need to know about blow off tubes into one helpful resource. So, carry on reading if you want to put all this great advice into practice.
Why not just leave your fermenter open?
If carbon dioxide building up in the fermenter is such a big deal, why not just leave the thing open to allow the gas to escape more quickly? Well, although the idea is backed up by practical science, it’s a disastrous course of action for a brewer to take.
If you allow your fermenting beer to become exposed to the elements you really risk a lot of nasty things getting into your beer. For example, if any sort of bacteria starts growing in your beer you could get some pretty funky off-flavors which will leave your beer tasting terrible.
Also, the simply exposure to ambient air can lead to oxidation of your beer and also some nasty aromas. Lastly, for the more OCD of us, you can end up with dust, insects and other contaminants floating in the average room to settle into your beer. Yuck!
How do you use a blow off tube for beer?
It is often very surprising for new brewers when they see just how energetic your first batch of beer will be in the production of carbon dioxide. Not being prepared for this, or worse completely closing the fermenter off, will lead to exploding fermenters and your beer going to waste.
There are two main ways to safely allow gas to escape your fermenting vessel without the risk of air or bacteria from entering it, an airlock and a blow off tube or valve. These two pieces of kit do the same job but are used at slightly different stages of the process.

Airlock: an airlock is a chamber which is half-filled with water which has been sanitized with a headspace of air at the top. As CO2 passes up through the airlock it bubbles up through the water and then out of the chamber through small holes at the top. In this way, air cannot enter the fermenting vessel while CO2 is allowed to escape it through the water barrier.
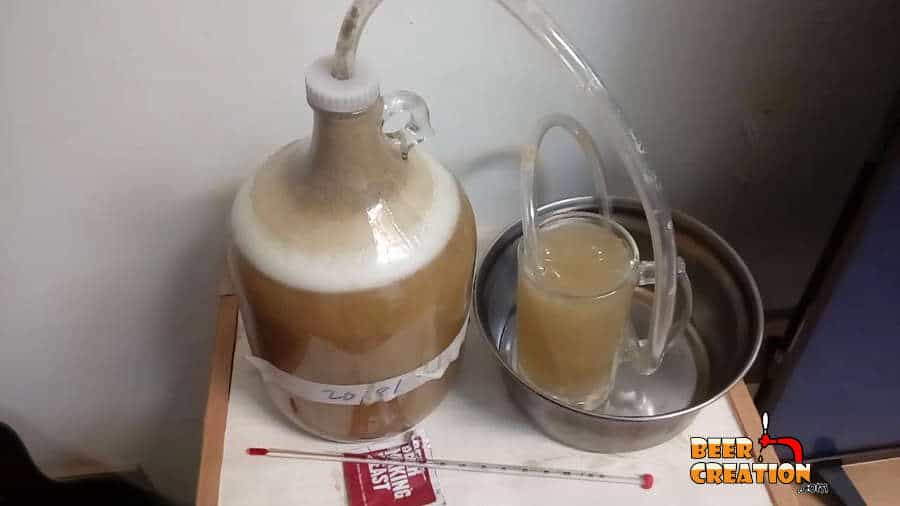
Blow off tube: a blow off tube or valve is a tube that is fitted snuggly into the neck or outlet of a fermenting vessel at one end while the other end is placed into a container of sanitizer. Again, it uses the principe of a water barrier to allow gas to bubble out of the tube and up through the liquid while air cannot enter the fermenter through the tube.
Of the two devices, you should use a blow off tube in the early stages of fermentation and then switch to an airlock later on. This way you will not have a huge mess on your hand as krausen (the foam caused during fermentation) escapes from the top of your fermenting vessel.

The Blow off tube set up.
Ideally, you will prepare your blow off tube before you finish the boil on brew day and well before you have racked your wort into the fermenter. Even if you are doing this after a blow out disaster, follow the steps below.
Preparing the equipment:
You’ll need a plastic tube, a container to hold liquid, and a bung or stopper for your fermenting vessel.
Depending on the size of the tubing you have, you might insert it directly into the outlet of the fermenter or, if you are going to use an airlock, over the male end of the airlock. When possible, opt for a tube which will fit snuggly into the outlet on your fermenter as it’s a lot less fiddly than trying to get it over the male outlet on an airlock.
Step 1
Before pitching your wort with yeast or your yeast starter, place a food-grade plastic tube in a container of sanitizer, rinse it thoroughly and allow it to air dry.
Step 2
Fill up a container with a sanitizing solution, something like star san or a similar brand. You can use any type of container but something fairly deep is advised as the tube could potentially move around during fermentation and could jump out of a shallow bowl risking infection and oxidation. Something like a beer mug or tankard is perfect as you can attach the tube to the handle.
Step 3
Clean and sanitize the top of your fermenter/carboy and the bung or valve which you will be placing it to it and which will hold the blow off tube in place.
Step 4
Heat one end of the tubing under hot water then insert the tube into the fermenter directly or over the male end of the airlock. If you are trying to use an airlock as the connection from your tube to your fermenting vessel, the heated tube will make getting it over the male end (the bit which sticks right up) easier.

If you are inserting the tube directly into the fermenter, only place about an inch of the tube into the actual container, which will limit the amount of krausen which enters the tube and will reduce blockage.
Step 5
Place the other end of the tubing into the container of sanitizer ensuring that it stays at the bottom. You may want to fix it in place with zip ties, if using a tankard or mug, or weigh it down with something.
Step 6
Sit back and wait for the bubbles to start!
Switching from blow off tube to airlock
The reason we use a blow off tube is to help carbon dioxide to quickly leave the fermenter so that it doesn’t build up and cause a pressure explosion. Yeast will often be the most active within the initial phases of fermentation, and that time period really depends on the strain of yeast, ambient temperature and availability of nutrients.
As a general rule, you will need to keep a blow off tube in place for anything up to four days after pitching your wort. Keep a close eye on the exit end of the tube in the sanitizer, while it is still bubbling like boiling water, keep the tube in.
Once the bubbles only come once every couple of seconds, you’re safe to switch to an airlock, although you could just leave the blow off tube in place for the duration.
Make sure that the airlock has been sanitized, or the other parts are if already using part of it in your blow off set up. Try to make the transfer as quickly as you can to limit the exposure of your fermenting beer to oxygen or bacteria.
When should the airlock start bubbling?
After you have made the switch from blow off tube to airlock, you should see bubbles start to work their way through your airlock soon after.
Remember that as fermentation continues, it’s not uncommon for less and less carbon dioxide to be produced as the yeast starts dropping out of suspension and becoming less active. So, if you notice that your airlock remains inactive after a healthy blow off tube phase, be sure to take an accurate specific gravity reading.
If the gravity of your beer doesn’t change and remains above the target gravity you were expecting, you may have an issue with your fermentation. I have written a detailed article about why this happens and how to fix it, so check that out if this situation refers to you.

Stainless steel versus plastic blow off tube
It’s possible to buy stainless steel blow off tubes which fit directly into your fermenter. It designed to totally replace the conventional airlock that many homebrewers use. The idea is that you can permanently set up a blow off tube system and not even bother with the airlock.
Stainless steel blow off tube
Pros
The advantage for this is that you don’t have to deal with filling up the airlock with sanitizer or risk that sanitizer somehow dripping back into the fermenter. Also, the stainless steel means that the tube is very durable and easy to clean.
Cons
Due to their design, the stainless steep blow off tube limits how far away the secondary container with the sanitizer water barrier can be from your carboy. Also, if you aren’t using a carboy fermenter or a bucker fermenter with the outlet on the side (not in the center) the tube won’t fit.
You can find this item for a very reasonable price on Amazon and it’s normally sold in a multi-pack version for simultaneous batches.
Plastic blow off tube
Pros
A plastic tube is easier to customize in terms of length and placement of your water barrier container. If you are limited in space, then you aren’t forced to put the second container right next to your fermenter, it can be above, below to the side or even next door if you need it to be. Plastic is generally cheaper and you get longer tubes for your money
Cons
Being plastic and flexible, this tube isn’t going to be as hard-wearing as steel and it probably will have a shorter life. However, this is also reflected in the cost.
You can get the right food grade tubing from most homebrewing stores or from Amazon. This item is a great seller and is more than up to the job as a blow off tube.
Alternatives to a blow off tube
A blow off tube is a solution to a very common problem and in this article, I’m suggesting that you use it as a preventative procedure. However, what if you have already experienced some sort of blow out or you don’t have any of the materials to hand for a blow off tube set up?
Well, one way, if you have an airlock, is simply to remove the airlock periodically and replace it after a few seconds to give more CO2 the chance to escape. This is a very crude method but can be effective.
Another option, also a preventative, is to ferment in a much larger vessel, to begin with. This extra headspace and by using a conventional airlock can allow your krausen (see my article on what this is here) to form and still enable the excess gas to leave the fermenter without negative results.
An additional alternative is to quickly transfer your fermenting beer into a keg and to allow it to ferment under pressure. You may need some additional equipment for this, but once the beer is safely in the keg you’ll have some time to gather this kit up.
If you don’t want to follow those tips or it doesn’t seem to fit your case, then you can simply allow your fermenter to remain open and wrap a towel around it to gather up any krausen which might escape and place a paper towel over it to stop bugs and dust failling inside. Try to limit the amount of time you do this for as oxygenation is a real concern.
Thanks for reading, don’t forget to share this article if you found it useful. Also, check out my YouTube channel for more tips and advice about brewing beer at home.