
I don’t know about you, but I always used to manage to leave something behind or under my lovely beer that’s already fermenting. Or, failing this, something happened and I had to shift where my beer was (normally due to the wife, just saying).
We all know that we have to think about a lot of factors like light, temperature, people coming and going, etc. when choosing a location for our home brewery. However, it wasn’t until much later that I started to think about the impact of moving a fermenter, even just across a room. Does it really matter?
At all costs, you should avoid moving a fermenting beer. Moving a fermenter around can lead to splashing, which will possibly introduce oxygen into the beer. This leads to oxidation & gives your beer a bad taste. If you do move the beer you want to take your time and do it as slowly as possible.
Ignorance is bliss, because the further down the homebrewing rabbit hole you fall, the more things you learn to fear!
You may have moved your beer around during fermentation a bunch of times and have not even noticed a special taste in your beer, or maybe you have but did not know what it was from.
There are different reasons for this and I will go over the reasons why you shouldn’t move your beer after pitching and if you have to, some tips to minimalize the damage.
Why moving your fermenter around after pitching isn’t a good idea?
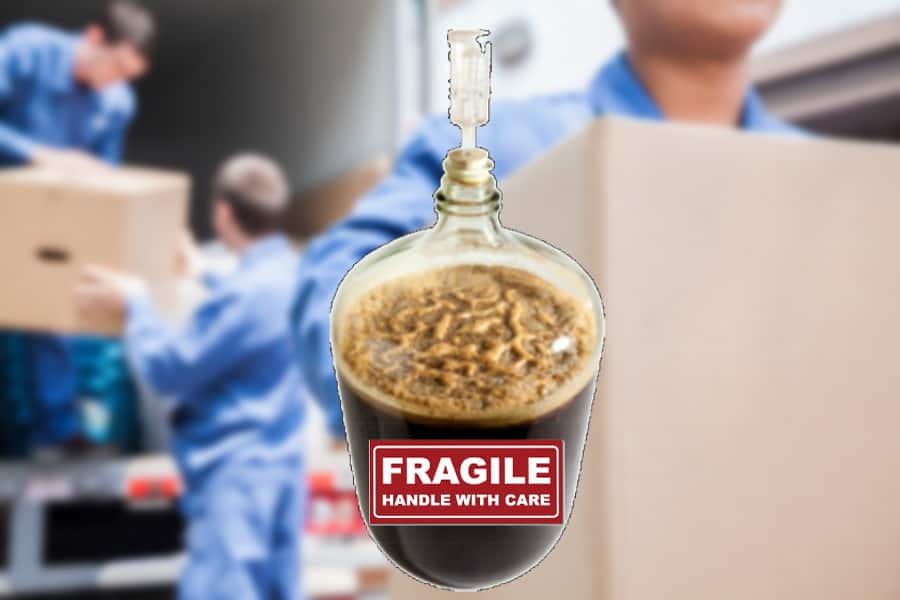
The general rule of thumb is that you don’t move the beer because of oxidation. Oxidation is a topic that is often mentioned, but not really talked about often.
The presence of oxygen is unavoidable at certain times and even, in certain situations, necessary. Other times oxidation is detrimental to your beer but probably can’t be helped. It can be hard to tell when it is good or bad for the average homebrewer.
There is a time when lots of oxygen in your homebrew is good, and it is especially beneficial early in the brewing process. You need to properly aerate your wort on brew day, this oxygen is essential for the health of the yeast.
After you’ve boiled/ cooled your wort and moved it to the primary fermenter, you will move your wort around by tiring, shaking, etc. This will give you a frothy head and the yeast you will be pitching needs this oxygen.

After pitching, The yeast will remove the oxygen present in the beer and you do not want to add any more oxygen or your beer may taste something like wet cardboard (who first figured that one out?). So, be careful and gentle as possible to keep splashing movements to a minimum.
So, basically, shaking your fermenter around before you pitch your yeast, good. Doing the same thing after pitching, bad. Check out my article here to find out more about when and how to shake your fermenter for the best effects.
New to homebrewing? Please feel free to read my ultimate guide to brewing beer at home and where to start.
Best fermenter to avoid oxidation
To minimize oxidation in a fermenter, you want to have a really tight seal. I’ve suffered from this over the years, so make sure that you treat your fermenter with kid gloves to avoid any micro chips or damage to the rim.
FermZilla Conical Fermenter

This is a great fermenter for limiting the risks of oxidation because it allows you to ferment under pressure. This can also help you when racking into a keg. Check out the latest prices and deals on Amazon.
Fermentasaurus

The advantage of the Fermentasaurus is that you can not only ferment your beer in a well-pressurized environment to avoid oxidation, but you can also then use that pressure to serve your fermented beer! If you are looking for an upgrade in your home brewery, check this beauty out here. (available on Amazon.)
Tips for moving fermenting beer when needed
Before you even brew you should consider a few factors when choosing a place for fermentation. You want to keep it out of walking traffic but still accessible to check on and clean up if a spill happens.
Also, don’t store it in the direct sun and keep it at a steady temperature. If it moving it can’t be avoided here are some tips for moving your beer while it is fermenting.
- Moveable platform- If you put the carboy on something with wheels that will give you the option to move it if something arises and you have to. This will help to avoid too much sloshing around and oxidating of your beer. Something like a dolly or dolly platform are optimal but think outside the box, even a chair or desk could work at a pinch.
- CO2 Build up- By allowing the CO2 to build up in the fermenter ( you can cover the airlock) to build up a protective blanket. This will help to mitigate the risks of oxidation as you really can’t stop all of the movements in the beer.
- Pump Transfer- You can use a pump to transfer the beer from one container to another through a long hose. You can do this in an airtight way to reduce oxidation, Of course, there will be some wastage of beer, but this should lower the risk of oxidation significantly.
Reason and when you should move your fermenter
As we have talked about it is not ideal but there are some situations that you should take the risk and move your beer while it is fermenting. The risk of oxidation will outweigh the downsides of these other factors.
- In the way- If your beer is in the way you will want to move it. You may have thought that chosen was a great spot but your pet, child, etc keep touching or bumping into it you will want to move it. These things will already cause oxidation so it will be better off somewhere else.
- Cooling it down- If the temperature of the room is too hot you will want to cool it down. If it is just for a day or two you can try wrapping the carboy or bucket in wet towels and even put ice or packets around it. The wet towels are the first choice as it may get really cold with ice. But if it is heatwave or the opposite in the winter it gets really cold and you need to turn up your heat quite a bit you will want to move it to a place with a more stable and cooler temperature.
- Warming it up- On the other hand if it is too cold you will need to warm it up. This can happen in the winter if there is a huge drop in temperature and reversely in the summer if you have to use the air conditioner all the time. Heating pad or wrap is ideal putting it next to the radiator is not. Weigh the risks of doing these things as you will most likely disturb and oxidate the beer either way and move it if necessary.
Just remember, even professionals have to deal with oxidation and we can only try our best to minimize its effects with good planning and careful manoeuvering.

So, should I stir my yeast in?
In general, most brewers will agree that you don’t need to stir dried yeast into your wort. You can just sprinkle it on the surface.
When it comes to rehydrating yeast, it is a very easy process and can be done on the day of your brewing. However, you don’t even really need to do that. I talk about it in this article if you want to read even more about it.
If you want to try rehydrating:
At the start of your brew day, you can start by boiling a cup of water then turn off the heat and put on the lid while it sits. This will sanitize the container.
While the wort is chilling, the water should now be at room temperature and you can add your dry yeast. Stir it in. After the wort is chilled, add your yeast by stirring it or just pitching it.
I have done it both ways and have not noticed any real difference in taste or quality of beer. If you think about it, dry yeast is dormant and it will take time for the yeast to rehydrate before it is active.
The amount of time it takes for rehydration from absorbing wort on top vs stirring it up is minimal, and all you are really doing is breaking the surface tension by stirring it. Some yeast will sink or become suspended and that is why some believe that absorption is faster, but there is no real proof that I’m aware of, besides anecdotes.
Can you move your fermenter before you bottle or keg beer?
Sometimes you’ll need to do this, but you should be very careful if you have to and take all precautions as with anything in the brewing process. In an ideal world, you would have arranged your brewing space so that you don’t have to do this.
However, if you have to keep your fermenter in a cooler part of the house, or in a fermentation chamber (check out my article for more information), then you can take steps to limit the splashing while you relocate it to your kegging or bottling area. See the tips below.
Can I open my fermenter during fermentation?
Listen to me very carefully, do not open your fermenter to check how your beer is doing. It’s absolutely fine and doesn’t need you ruining its day! You should not have to do this anyway unless you are doing one of four main things.

The first real reason to open your fermenter and this is even before fermentation, is to first pitch your yeast. This is the first real danger your beer faces after you’ve done boiling the wort. However, it’s true that at this stage any excess oxygen will be gobbled up by the yeast during fermentation, so don’t sweat it.
Secondly, you can open your fermenter to add hops for dry hopping. Again, although you’ll do this after the most vigorous stages of fermentation, the yeast will still usually be active enough to deal with any extra oxygen you introduce, but not all of it. Check out my article on the other risks of dry hopping.
Third, another reason to open that fermenting vessel is to transfer the beer to another container (secondary fermenter or bottles/keg). This is the debt that all brewers have to pay, and even my professional brewer friend said it’s just part of the job.
The final reason to open up your fermenter, and shouldn’t be happening often if ever is that the beer is not fermenting. You may be able to tell this by the lack of krausen or airlock activity. If this is happening to you, check out this article on what to do.
Can you move beer bottles during bottle conditioning?
Once the beer is safely sealed in bottles, you can definitely move them from place to place, but don’t go to town shaking them up!
There are not many things that could go wrong at this stage and that the only real danger is if they are overprimed. By moving them it is possible to increase the pressure leading to an explosion.
To take some safety measures I would recommend storing them and moving them in boxes or some form of plastic tub. If there were to be any issues this would contain the explosion and help in the cleanup.
Can you move a keg?
Yes, you can but again it shouldn’t be shaken up too much. This could be hard in a car or truck. Depending on the size of the keg I would recommend driving slowly and wedging it between the seat on the floor with some sort of buffer like towels. The trunk or the bed of a truck is not a great place as it moves around a lot.
The temperature needs to be controlled as much as possible as well. A cooler would work fine for a 5-gallon keg, and you can even find ones now that are made just for kegs of all sizes. If it is shaken up or not you still will want to let it rest (at drinking temperature) for long as possible before tapping and drinking it.
For more details on how to move and keep a keg cool when you get there, check out the following article.
