
A wort chiller is considered as a vital piece of brewing equipment by most homebrewers, though most of us brewed our first beer without one. Not only are wort chillers important labor-saving devices, but they also add to the overall quality of the beer.
For your first brew day using the ice bath method is effective, but for serious brewers, an immersion wort chiller is more efficient. 50 feet in length is ideal. Counterflow & plate chillers need only be considered for more advanced brewery setups. A good wort chiller will cost between $50 & $150.
In this article, I have gathered together weeks worth of research into the best immersion, counterflow, and plate chillers currently on the market. I’ve discussed the matter with hundreds of other homebrewers to bring you the ultimate guide to everything about wort chillers you need to know before making a purchase.
What is a wort chiller?
So, before we get started let’s make sure that we are both talking about the same thing. What is a wort chiller and what is it used for?
A wort chiller is a piece of equipment which is used by brewers to, as you’ve guessed it, cool down their wort (beer before it’s been pitched with yeast) after having followed their brew day schedule during the boil.
As most yeast strains cannot survive in temperature above about 70°F (21°C) it’s important to cool your boiled wort down. However, this is easier said than done. Not only will the wort retain its heat for a long time, as a liquid, while it is cooling it’s in extreme jeopardy.
Cooling wort can easily be exposed to a number of contaminants which can adversely affect the finished beer. This is why many homebrewers use some sort of wort chiller to accelerate the cooling period and avoid any mishaps along the way.

Advantages of using wort chillers
There are several advantages to using a wort chiller rather than allowing your wort to cool more naturally.
These include:
– Reducing the length of your brew day by being able to pitch your wort much sooner.

– Improving the clarity of your beer by creating a better cold break and forcing proteins in the wort to coagulate better.
– Reduces the exposure of your wort to contaminates in the air before getting it into your sanitized fermenter.
– Helps lock in the aroma and taste of later additions of hops during the boil
Different designs
When it comes to wort chillers, there are three main designs that you should be aware of, each with a slightly different approach to the problem of hot wort. These are, of course, the immersion design, counterflow design and plate design of wort chillers.
So let’s take a look at each type and talk about the differences between them.
Immersion Wort Chiller
An immersion wort chiller, as the name suggests, is one which you immerse in the wort itself. The other two designs are external units that the wort and water coolant are run through.
Basically, the immersion wort chiller design is a single metal tube, usually copper, which has been twisted into a coil with two long arms or protruding tube ends.
It’s designed so that the coil body sits submerged in your hot wort while the longer arms stick out above the rim of your brew kettle. Certain designs will also jut out over the rim of the kettle to avoid adverse effects from fitting leaks.
How it works
Just like the design of the immersion wort chiller, the method it uses to cool the wort is simple too. Literally all you need to do is fit two plastic hoses, usually, a silicon-based tube is best, and attach one to a water source another to a drain.
You simply run colder water from your mains water supply through the copper tubing and allow it to flow out of the other end into a bucket or sink. Because metal, especially copper, has good heat exchange properties, it allows heat from your wort to be transferred to the water flowing through the wort chiller.

In this way, the heat is carried out of your wort by the cooler water running through it within the wort chiller.
Counterflow Wort Chiller
A counterflow wort chiller is essentially a souped-up version of an immersion wort chiller. Although it doesn’t actually sit in the wort itself, it does use the same principle of running cooler liquid through a coiled pipe.
As this type of chiller doesn’t sit in the brew kettle, you do need a little more space to use them and they aren’t ideal for brewing in smaller spaces. This being said, they are relatively compact so they are a good choice for most homebrewers.
How it works
The counterflow is a tube within a tube. Wort is forced through a central metal tube with cool water flowing around it in the opposite direction through another tube which can be metal or plastic.
Due to the long exposure of the wort to cool water as they both flow through their own pipes, it can be cooled down very quickly.
Whereas the wort is returned back into the original brew kettle while cooling, the water is extracted through a drainage pipe and can either be collected or discarded as needed.
Plate Wort Chiller
The plate chiller is by far the more complex way to chill your wort but works in much the same way as a counterflow chiller. Again it is an external unit in which you have to force your wort and cool water through, sometimes a pump can be used to do this.
How it works
As I said, the principle behind a plate wort chiller is very much the same as a counterflow chiller. Wort is forced into the chiller in one direction and water in the other. However, with this type of chiller, the wort and cool water don’t flow through long tubes but rather over plates.
The plates form a sandwich of sorts with the wort flowing between two rows of cool water. The thinness of the plate design actually leads to more surface exposure and this is why these types of wort chiller can cool wort very rapidly.
Yes, it’s due to the design of this type of chiller that its heat exchange properties are excellent and wort can be cooled down in a matter of minutes. However, it’s also a lot harder to clean than a counterflow wort chiller due to the complexity of the design and small gaps between the plates, etc.

New to homebrewing? Please feel free to read my ultimate guide to brewing beer at home and where to start.
The three types compared
Type | Ease of use | Cooling time (to 70°F)* | Cleaning | Size* | Cost* |
|---|---|---|---|---|---|
Immersion | very easy | 20-40 mins | easy | L: 10″ W: 8″ H: 15″ | <$100 |
Counterflow | intermediate | 10-20 mins | medium | L:14″ W: 13″ H: 7″ | $100-$300 |
Plate | intermediate | 10-20 mins | hard | L: 8″ W: 4″ H: 3.2″ | <$100-$300 |
*average
Recommended Wort chillers
Immersion chillers
NY Brew Supply W3850-CV (Super Efficient)
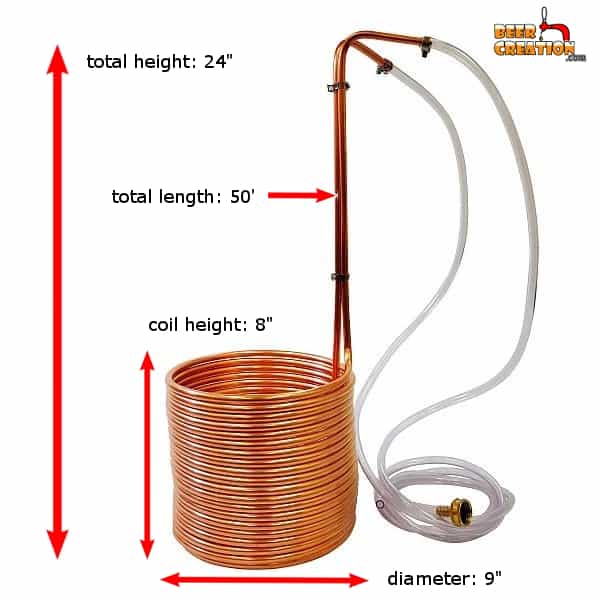
Specification:
– 50-foot copper tube (total length)
– 24-inch total unit height
– 9-inch coil diameter
– 8-inch coil height
– 3/8 inch tube diameter
– 12′ vinyl tubing
– brass hose adapter included
This model of immersion chiller has to be one of the most popular on the market and has super-duper cooling powers when it comes to reducing the temperature of your wort rapidly. It’s all down to the full length of the copper tubing in the coil, a whopping 50 feet!
This added length, compared to other 25 foot models gives you a lot more heat exchange capacity and so helps you cool down your wort even faster. This being said, longer doesn’t always mean colder in the wort chilling world.
A top tip is to actually use a more moderate flow of main water through the wort chiller to increase your rate of cooling. I think this is something to do with the added friction of water molecules on the surface of metal causing heat if it’s passed through the chiller too quickly, but I’m not a scientist!
The vinyl tubing included comes in one long 12-foot length which you can easily cut to size as needed. However, always leave yourself a little extra slack to play with.
General tips:
As with all immersion chillers, you’ll be placing the W3850-CV directly into your brew kettle with your precious wort.
So to avoid any possible drippage (which isn’t a real problem with this model) you should try heating the input and output before sliding on your silicon tubing and fixing your claps. This seems to provide a much better seal to your inlet/outlet overall.
Also, because the copper is so malleable, you can actually bend the input and output arms to a slight angle so that they aren’t directly over the surface of the wort. Just be sure that you don’t bend them too aggressively and cause a kink. An angle of 30° or so is all you really need to be 100% sure no drips make it into your wort.
Check out the latest deals for the W3850-CV wort chiller on Amazon.
Northern Brewer – Silver Serpent
Specification:

– 50-foot stainless steel tube (total length)
– 16-inch total unit height (to bend)
– 9-inch coil diameter
– 8-inch coil height
– 3/8 inch tube diameter
– barbed fittings
– drop-angle design
I’m a huge fan of anything from Northern brewer from their starter extract kits to pretty much all their brewing equipment. The main reason is that it’s clear to see that this is a group of guys who actually brew themselves and are always coming up with solutions to common brewing problems. This is why the silver serpent has to go on the list!
Although made from stainless steel instead of copper, which is a better heat conductor, this material is more durable and much easier to keep clean. So, you probably won’t have to buy another immersion chiller ever again, so a pretty good deal for such a reasonably priced unit.
The other major development breakthroughs come in the form of the drop-angle input and output arms and the barbed fitting.
Most new brewers, and I was the same, suffer that annoying situation where you realize your cooling water has been dripping into your wort for the last 20 minutes. Bad seals on your input and output tube fittings can introduce contaminate into the beer and potentially ruin it. Northern Brewer has overcome this silly design flaw with their unique barbed fittings which make sure your hose clamps really keep the water in the wort chiller.
As a double protection against unwanted contamination of your wort, the Silver serpent has a cool drop-angle design which makes sure the entry and exit points on this wort chiller aren’t positioned above the wort itself. I think that’s really clever. Just make sure that you measure your brew kettle so that you have enough clearance as to not have the wort chiller hanging off the side of the kettle’s rim.
Another great thing about this particular unit is that you can use it inside and outside as it has standard garden hose connections which are great for most faucet types even without a special connector.
Check out the latest deal on the Silver Serpent (love that name) on Amazon.
(budget option) NY Brew Supply W3825-CV
Specification:
– 25-foot stainless steel tube (total length)
– 16-inch total unit height (to bend)
– 9-inch coil diameter
– 8-inch coil height
– 3/8 inch tube diameter
– 12′ vinyl tubing
– brass hose adapter included
Due to the design of immersion wort chillers, they are actually fairly cheap to produce however, I wouldn’t recommend that you go with the cheapest options out there. This is why I recommend the 25-foot version of the NY Brew Supply W38-CV series.
Although marginally cheaper than its 50-foot cousin, this is a good option for brewers who perhaps only plan to brew smaller batches and so won’t need the additional heat exchange length later on in their brewing careers.
The W3825-CV has all the same benefits as the W3850-CV without perhaps the same level of efficiency for larger batches.
Check out the current deals for this budget wort chiller on Amazon
Counterflow chillers
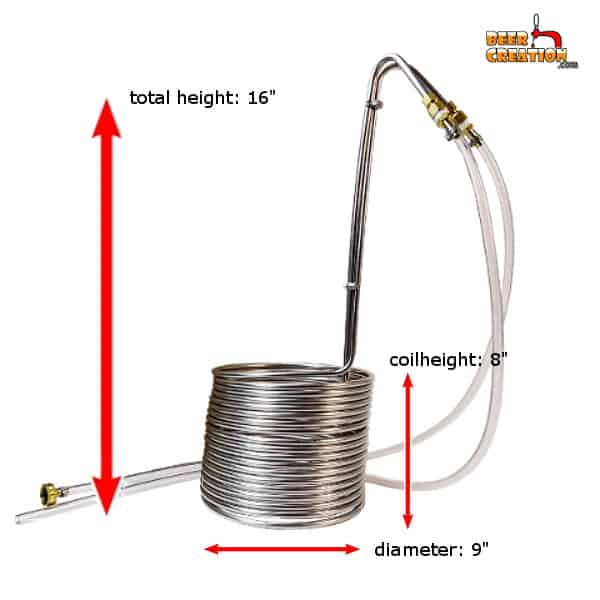
Kegco FL-SCFC
Specification:
– 12-foot stainless steel tube (total length)
– 16-inch total unit height (to bend)
– 6-inch coil diameter
– 10-inch coil height
– 5/8 inch outer tube diameter
– input/output (wort) half-inch tube and hose clamp
– input/output (water) 3/4″ female and male GHT
There is some debate within the homebrewing community over whether or not a counterflow wort chiller is superior to an immersion chiller. Of course, it depends on your batch size and the unit you choose.
The Kegco FL-SCFC is particularly good for brew batches up to 5 gallons but starts to drop off in efficiency when you go over 10-gallon brew days.
This particular model is designed so that all its connections have been welded into place meaning that accidental drips (and possible contamination) are avoided. Seeing that it’s entirely made out of stainless steel, it’s both durable and much easier to clean than copper versions.
All in all, this unit will halve the cooling time of your wort in comparison to any comparable immersion wort chiller but does require a little more time to set it up and clean it after use.
Check out the latest availability and best price on Amazon for the Kegco FL-SCFC.
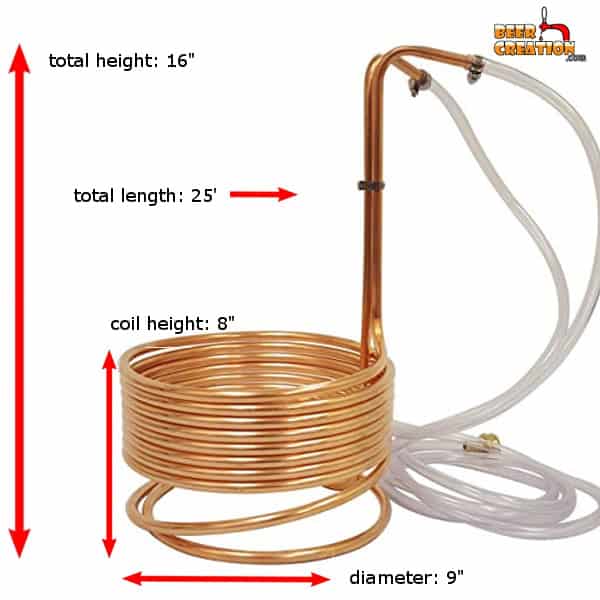
NY Brew Supply Deluxe
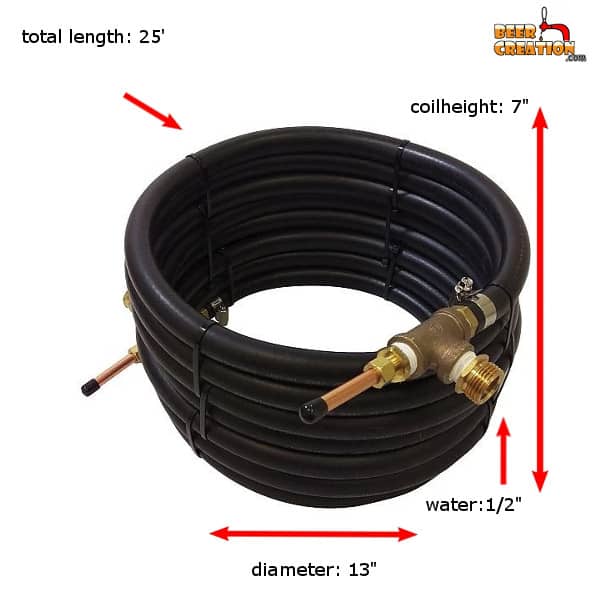

Specification:
– 25-foot copper tube (total length)
– 13-inch coil diameter
– 7-inch coil height
– 1/2 inch tube diameter (outer)
– brass garden hose fitting (flexible)
This really is a great mid-range unit and maybe the only counterflow chiller you ever need to buy, even when you increase your brew day yield.
Although the outer tube is plastic, it’s extremely durable and designed to deal with extreme heat, so don’t be fooled into thinking it’s just ordinary garden hose. Far from it!
This series comes in a half or three-eights of an inch model, and I’d really recommend you push the boat out and get the larger diameter unit. This is because you’ll get much better efficiency with the added capacity flowing through the water tube.
Unlike my other suggestion, the NY Brew Supply Deluxe is made largely from copper and that gives it yet more heat exchange capacity which is ideal for larger yield batches. It is, however, slightly larger so make sure that you check the dimensions before you buy.
One bonus, perhaps, the NY Brew Supply Deluxe has over the Kegco is that its brass fittings aren’t welded to the unit, which means that it’s a lot more flexible and you have a lot more give in the fittings.
Of course, this is at the loss of the confidence that you’ll never get a leak from the fittings. However, if you use the correct size faucet connector, the fittings which actually come as part of the unit won’t let you down.
Check out the best prices and fastest delivery times on Amazon for the NY Brew Supply Deluxe.
(budget option) Counterflow Wort chiller
Honestly, I have looked on the market far and wide and I would not recommend that you skimp on a decent CFC. If you only want to spend $50-$100 on your wort chiller, it’s far better to invest in a higher-end immersion chiller than a low-end counterflow unit.
I hope that you understand why I don’t feel comfortable recommending anything that’s just going to be cheap and ineffective.
Plate chillers
Blichmann Therminator BL100 Wort Chiller
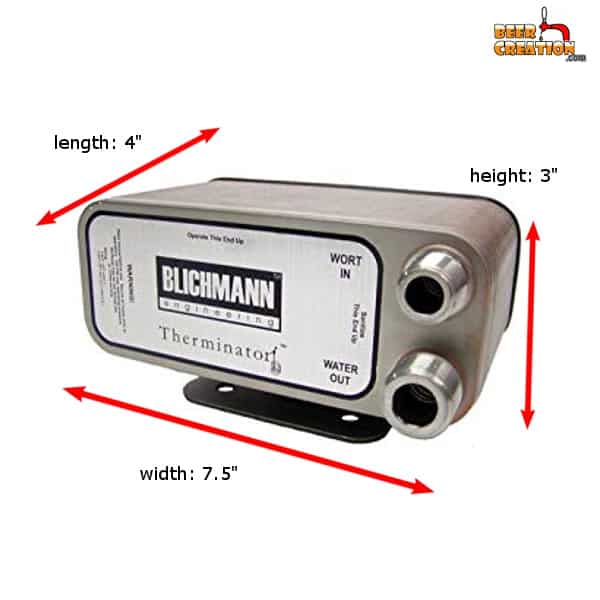
Specification:
– height : 3″
– length: 4″
– width: 7.5″
– 316 stainless steel plates and fittings
– very rapid cooling capacity
This has to be the ultimate wort chiller on the market at the moment and is great if you are really into homebrewing, but I wouldn’t recommend this to the average beginner. That’s not because it isn’t a fantastic piece of kit, it’s just when you first get into making your own beer you really don’t need to splash out on top-end kit like this.
That being said, the Therminator’s ability to rapidly cool down large batches to pitching temperature in a matter of minutes, may be reason enough for every brewer who able to get to do just that.
Although plate cleaners are notoriously difficult to clean seeing as how organic material can easily become trapped with their many nooks and crannies, this unit is very easy to sanitize. All you need to do is place the entire unit in boiling water and after fishing it out carefully it’s ready to go.
Due to its construction, the Therminator will never lead internally and with threaded hose connections, you don’t even need special adaptors to hook up your water supply. The wort inputs take 1/2″ male NPT fittings which are more universal and less hassle to clean than the female versions.
This really is a professional piece of kit and so comes with a professional price tag, but it’s still not as expensive as you might think especially if you are an avid brewer.
Check out the availability and latest price on Amazon and get your very own Therminator.
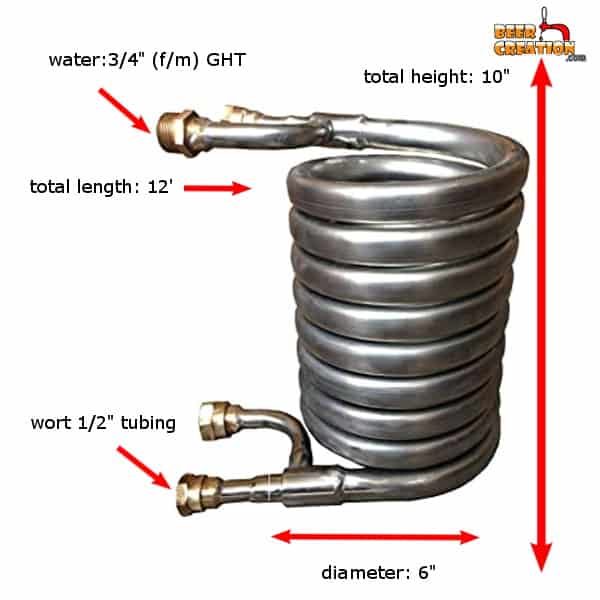
B3-23A 20 Plate Wort Chiller
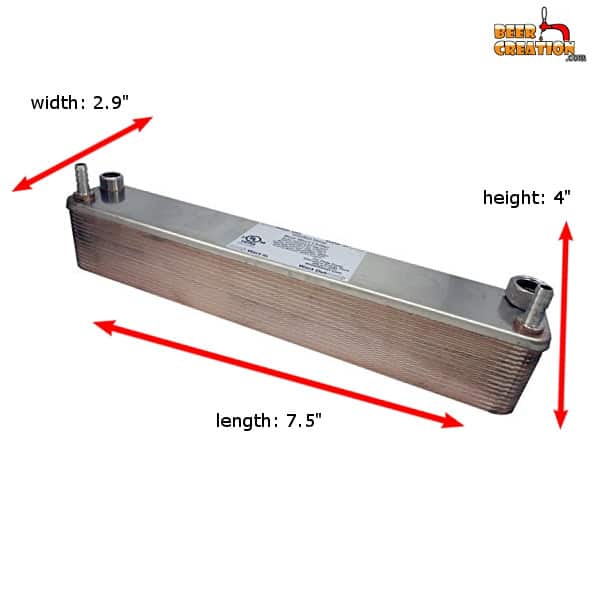
Specification:
– height: 4″
– length: 7.5″
– width: 2.9″
– 20 stainless steel plates (99.9% copper brazing)
– 1/2″ male NTP
– water (out) 3/4″ male NTP
– very rapid cooling capacity
This is an excellent mid-range plate wort chiller and will have extremely effective cooling for yields ranging between 5 and 10 gallons. It may not be suitable for larger brew days than this hower.
It boasts threaded NPT fittings and will fit a conventional garden hose without the need for special adapters.
Although you aren’t able to easily disassemble the unit without risk of damaging it, cleaning it with regular soapy water and then following your normal sanitizing routine is fairly easy. Also, a pump for your wort or water isn’t absolutely necessary as long as you use gravity to your advantage.
If you are looking for a step up from your counterflow chiller, and especially your immersion chiller you can’t go far wrong with the B3-23A.
See the latest price and whether it’s available for delivery today on Amazon.
(budget option) HFS(R) Homebrew Beer Wort Chiller
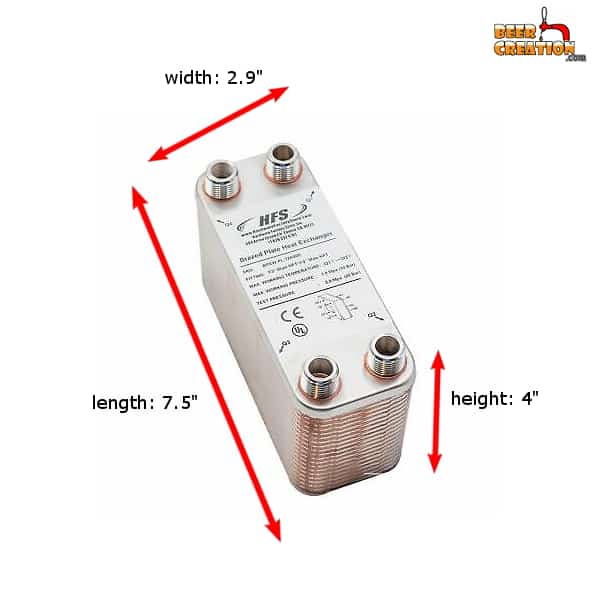
Specification:
– height: 4″
– length: 7.5″
– width: 2.9″
– 30 stainless steel plates (99.9% copper brazing)
– 1/2″ male NTP (wort)
– very rapid cooling capacity
I chose this as my budget option as this brand has a range of wort chillers which could fit any budget, I’m concentrating on the 30 plate model with the specs given above.
Although it may not cool your wort down as fast as the Blichmann Therminator BL100, you are going to have a much shorter brew day that if using an immersion wort chiller. Whether or not you use a pump or rely on gravity, this unit will ideal for your home brewery.
Just be aware that the wort inflow and outflow ports are 1/2 inch NTP and the water ones are 3/4 inch, which is the standard size for a garden hose.
Be sure that you have a suitable filter, something like a bazooka filter (Amazon), in your brew kettle to limit the amount of hops material which passes through the wort chiller. If you can manage to do this, then cleaning it isn’t going to be too much of an issue, even if other organic material does get through.
For the price tag, I think this is a great little wort chiller which is a great addition to the wishlist of any serious homebrewer.
Check out the latest deals and reviews over on Amazon.
How many wort chillers should you buy?
You might think that the answer is obvious, “I only have one brew kettle, so only need one single wort chiller!”.
The thing is that most brewers simply use the mains supply to the municipal water pumped into their street. Although generally cold, it’s only as cold as the ground pipes it’s flowing through. This is great in winter but can be an issue in summer.
Basically, with any wort chiller, you are using, you’ll only be able to cool it down to around the same temperature of the water you are using as a coolant. Often in the hotter months, this can be above the optimal temperature for pitching your yeast.
One solution to this is to have a second wort chiller which you set up as the first one in a series of two or more and place this in a bucket of ice water (if using an immersion wort chiller). This will have the effect of cooling down the coolant water even further, meaning your wort will be chilled to a lower temperature too.
Of course, you could do the same thing with an additional counterflow or plate wort chiller by running a tube from a bucket of ice water into the unit. However, in my opinion, it’s less complex to do this with an immersion chiller, something like a 50-foot silver serpent would be ideal!
How to chill wort faster and lower
As I’ve said, cooling your wort is possibly THE most dangerous time during your entire brew in terms of infecting your wort/beer with something nasty. Frankly, if brewers could avoid doing it they would.
So, getting the temperature down fast is very important and you really don’t want to be hanging around during this part of the brew day. So here are some tips on how to do that more quickly.
Stir your wort
It sounds like an obvious thing to do, but it wasn’t for me during my first couple of brew days. At the time I was using an immersion wort chiller (on the cheap side) and I had a built-in thermometer fitted to my brew kettle.
After nearly an hour I couldn’t figure out why my wort temperature was still hanging around 80°F/26°C. Then I physically touched the brew kettle and it was cold at the bottom but still quite hot at the top where the thermometer was attached.
Like a fool, I’d not considered the fact that cold water sinks while warmer water will stay above it. As the wort chiller’s coils weren’t tall enough, only about half of the wort was in contact with the water coolant.
The simple solution is to constantly stir your wort during this process to make sure it’s being circulated well around the wort chiller. You can do this by hand or use an aquarium water pump. It also gets your wort nicely aerated before you pitch your yeast.
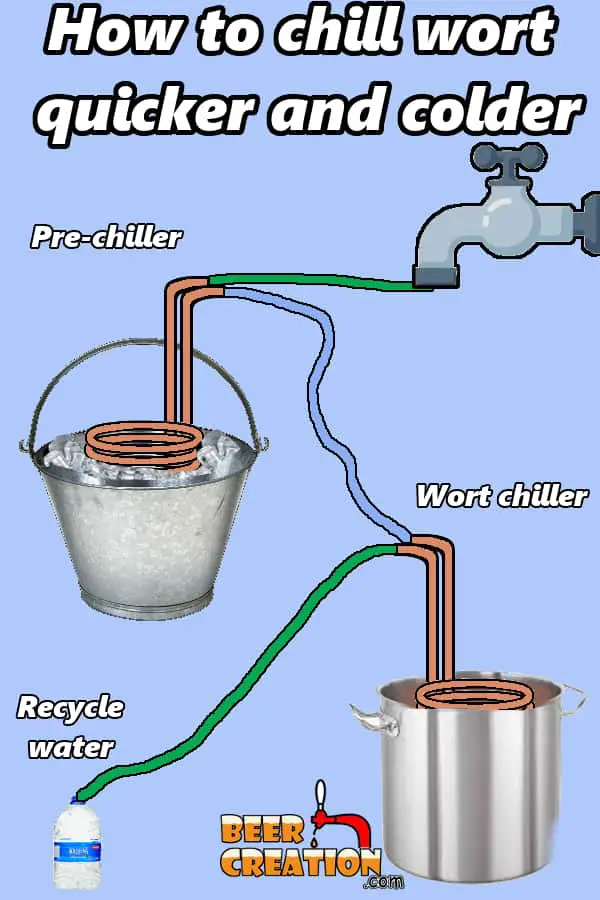
Pre-chiller
As I’ve mentioned before, consider using another wort chiller, preferably an immersion chiller in ice water, to chill your water coolant. The lower the temperature of the water you are using the lower the temperature you can bring your wort down to.
It’s just basic physics really. If your mains water supply is hotter than your target pitching temperature, you’ll never cool the water down enough. In summer, I have this exact issue and I will certainly be following my own advice here and installing an additional immersion chiller into my system.
Cool chamber
If you don’t have or don’t want another wort chiller, then you can simply do as much as you can with your current set up and then rack your wort into your fermentation vessel and stick that into a cooling chamber. Basically, your refrigerator.
In this way, you can get the temperature down as quickly as possible with your wort chiller and then allow the cooling chamber, whatever it may be, to take care of the final job.
Alternative to wort chillers
Ice bath
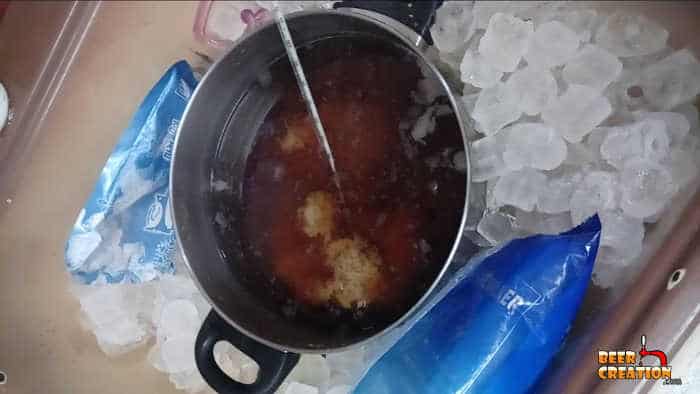
This is the go-to method for any brewer who doesn’t use a wort chiller but can also be used in conjunction with an immersion model to speed up the cooling process.
This works best if you are using a deep sink or vessel which your entire brew kettle or pot containing the wort can sit in. Remember that the more surface area of the brew kettle you can expose to the ice the better. If possible, you should try to move the ice about to ensure every part of the pot is being cooled and also stir the wort itself.
Overnight cooling
Another method which a lot of brewers still use today and was certainly used during most of history is simply to let the wort cool down naturally.
In the past brewers would have done this in large trays or troughs and relied on open-air fermentation, but I don’t recommend this. Simply rack your hot wort into your fermentation vessel, making sure that it can handle the heat and seal it up from the elements. Once it’s cooled down to the correct temperature, normally by the next day, you can pitch your yeast as normal.
Is there anything wrong with doing this? I really don’t think so. The only reason most brewers use a wort chiller is that they want to get on with pitching their beer and get fermentation started asap.
For a more in-depth look at alternatives to wort chillers and how to cool down your wort faster, check out this article I wrote on the topic.
Wort chiller to match your batch size
It is, of course, possible to use all three types of wort chiller for any size batch of beer, but some will perform better than others. It’s all down to the efficiency of the design and their individual heat exchange properties.
5 gallons or less
If you are going to cap your brewing yield at no more than 5 gallons (19 liters), then you really don’t need to invest in anything more than an immersion chiller (see deals on Amazon). With this amount of liquid and with constant stirring and even an added ice bath, you can cool your wort within about 20 minutes. That’s just fine for what you need.
5 to 10 gallons
if you are brewing larger batches on a regular basis then this is when I would suggest you invest in a good counterflow chiller (link to Amazon). They are perhaps a little more expensive but they will really save you time during your brew day. A decent CFC will chill 5 gallons in perhaps 10 minutes or less and even 10 gallons won’t take as long as it would with an immersion chiller.
10 gallons plus
If you are brewing this much beer on one day or even during one weekend, you’ll really appreciate the speed of the plate chiller variant (my recommendation on Amazon). It will be worth the time it takes to clean it later because you can literally cool the wort down to your target pitching temperature as it flows through the unit, especially if you invest in a higher-spec model
Go down the DIY route
If you are good with tools and like getting your hands dirty then you can always have a go at building your own wort chiller at home in order to fit your own brewing set up. Although time-consuming, this can be a pretty good way to save money and get to know the chilling process more intimately.
DIY immersion wort chiller
DIY Counterflow wort chiller
DIY Plate wort chiller
To the best of my knowledge, it’s not easy to build your own plate chiller as the technology is a little bit more involved than with an immersion or counterflow chiller. So if your heart is set on having a plate chiller, you will just have to buy one.
How much water do you need to use?
Unfortunately, using any type of wort chiller is going to waste a heck of a lot of water, assuming that the output goes into your drain.
You can calculate how much water your immersion and counterflow chillers will use quite easily, your plate chiller may require a bit more data about the plate surface area.
Basically you need to know the flow rate of your source of water, your garden hose for example and then calculate the reduced flow rate within your chiller’s water tube.
You can figure out your flow rate by filling up a vessel with a known capacity, your carboy for instance. Once you know how long it takes to fill a 5-gallon carboy, you can calculate your flow rate
(Vessel capacity / time to fill) x 60
= flow rate per minute (gallons)
Next, you need to calculate for the difference in the area within your chiller’s tubing. This is when we use the long lost formulas we all used in school: pi x radius²
Example:
If you are using a 3/8 inch diameter 25-foot chiller:
pi x (0.375 / 2) x 2 = 0.1178
This is the number you’ll need if you really want to apply Newton’s law to just quickly the wort chiller cools, which I won’t go into here but which you can check out here.
You could actually test the exact flow rate of an immersion chiller or counterflow chiller by filling up the same carboy, but let’s assume that it’s reduced by about a third.
New flow rate per minute = flow rate per minute / 3
So given this rough calculation, below is a rough guide to how much water you’ll need per minute for your wort chiller based on your initial flow rate per minute.
Water Source FR/pm (gallon*) | Wort Chiller FR/pm (gallon*) | Gallons after 10 mins* | Gallons after 20 mins * |
|---|---|---|---|
1 | 0.33 | 3.3 | 6.6 |
2 | 0.66 | 6.6 | 13.2 |
3 | 1 | 10 | 20 |
4 | 1.33 | 13.3 | 26.6 |
5 | 1.66 | 16.6 | 33.2 |
6 | 2 | 20 | 40 |
7 | 2.33 | 23.3 | 46.6 |
8 | 2.66 | 26.6 | 53.2 |
9 | 3 | 30 | 60 |
10 | 3.33 | 33.3 | 66.6 |
*1 gallon =3.78 liters
How to reduce water waste while cooling wort
This is an issue close to my heart and I really hate wasting water when it can be avoided. Luckily there are a few things you can do in order to reduce the amount of water you use and even recycle it.
Recycling
You can simply collect the water which flows out of the outlet of your wort chiller for later use. As it’s coming out of your household water source, the garden hose, etc, there is nothing wrong with it.
So, have a lot of empty containers or a large rain barrel and just collect the water as you go. It can be used later to clean your equipment or water your plants. It can even be used to fill up your toilet or wash your car.
Reduce
Rather than racing around to fill up containers that are spilling over, you can set up a closed pump system that just recirculates the same water through your wort chiller. If you use a bucket full of icy water as your source, then even better. This way you’ll use a lot less water and get the added benefit of cold water running through the pipes. Just remember to keep topping up the ice as the hotter water comes flowing back into the bucket.
I hope that you have found my guide to the best type of wort chiller for your home brewery useful. If it’s helped you, please consider sharing it with a friend. Thank you!