From bitter, bitter, experience, I’ve found that kegging the beer you plan to drink at home is much better than bottling 50 to 60 bottles per batch. Certainly when it comes to labor.
I also know from bitter experience that lugging a full keg down a hillside to a group riverside picnic isn’t a joy either.
As we know, beer is for sharing (otherwise people accuse you of things) but how can you enjoy the best of both worlds?
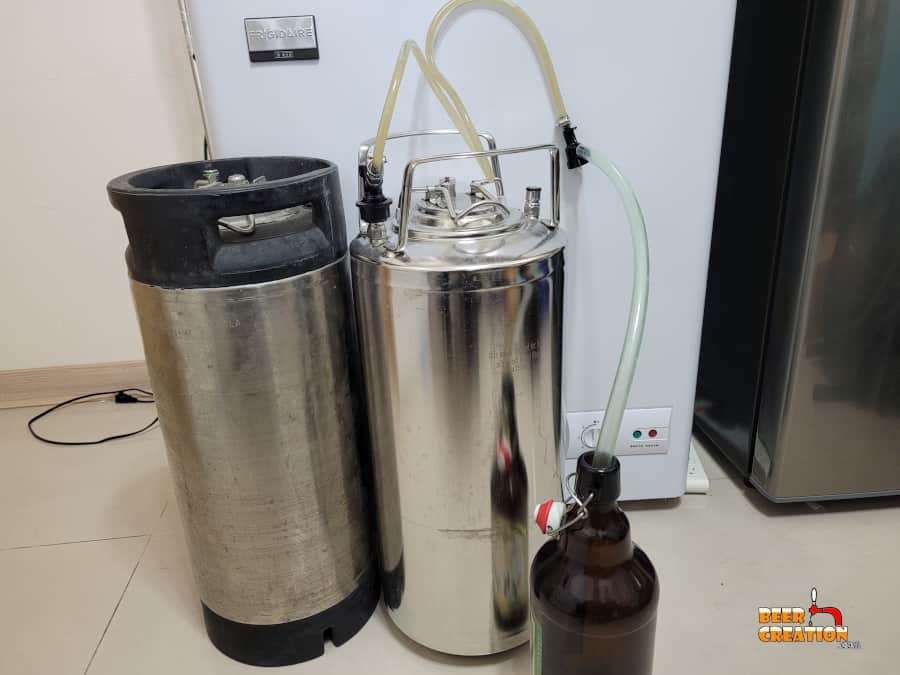
Bottling beer directly from a pressurized keg is a good way to store, mail, or share a small quantity of your beer. You don’t need any particularly special equipment, though some sort of counter-pressure system does ensure a cleaner pour. Excessive foaming & decarbonization are the only concerns.
I’ve been looking into each and every viable way to bottle beer directly from a keg or keezer, one to fit every budget. So keep reading to find the best method for you.
Why would you want to bottle beer from a keg?

I think before we get into the ‘hows’, let’s talk about the ‘whys’ of bottling beer from a keg.
You might be reading this because of a particular issue or requirement you have today, I want to open your eyes to new and previously untapped possibilities (see what I did there) that are out there for you.
So why would you want to bottle beer when it’s already nicely carbonated in a bottle?
The main reasons to bottle beer from a keg is to share it with others, enter a brewing competition, or improve the character or appearance of your beer. It is not a required process for anyone who wants to enjoy their own beer at home and does come with some drawbacks.
let’s look at those ideas in a little more detail.
Gifting beer to friends and family
By far the most common reason for me to want to bottle beer is so that I can share it with others and get that rush of ‘I’m awesome’ when they congratulate me on it.
This is a cool gift idea for birthdays and Christmas (see some more here) and also just a nice thing to do for visiting guests.
In this case, you want to make sure you have a quick method so that you can excuse yourself for a few minutes and return with a six-pack of bottles or growler full of your fantastically homebrewed beer.
Check the methods below for the best one for this situation.
New to homebrewing? Please feel free to read my ultimate guide to brewing beer at home and where to start.
Sending a winner to a beer Competition
In every case, when you enter (and win – see my article here) a beer brewing competition you will have to present your entry in a bottle.
In this case, you may want to keg your beer before you bottle and ship it to help improve its quality and appearance.
Generally, when bottle conditioning beer you’ll find that it doesn’t travel well to competiotions as nobody will care about your beer as much as you.
What I mean by that is that sendiment in the bottle, which is a natural byproduct of bottle conditionn, can be distrubed and alter the appearance of your beer.
A beer judge probably won’t be bothered about letting the beer settle and regain its best qualities, so your score will suffer.
This brings me to my next point.
Producing a better carbonated beer
Another way that bottling from a keg might be useful is in order to get a more uniformed carbonation across your batch of homebrew.
Removing sediment from your beer
This sort of goes hand in hand with the previous point. If you wanted to produce ‘filtered’ beer without having to pay for all the equipment modern commercial breweries have (buy beer from local breweries), then bottling from the keg is an option.
By using a floating dip tube (see Amazon) you can actually rack your beer while leaving any sediment behind.
As kegging doesn’t involve using priming sugars you’re going to find a lot less yeast sediment, if any at all, gets into bottles racked from a keg rather than a fermenter.
I don’t know about you, but each time I open a bottle of bottle conditioned homebrew it’s a gamble. Is it going to gush, rush or crash?
Carbonating in a keg and then bottling would certainly ensure that your beers are all carbonated to much the same level as if you were just using priming sugar or carbonation drops (see Amazon).
However, I would only recommend this if you are transporting a few examples to friend or to a competition. It just wouldn’t make sense to do this for your own consumption unless you were trying to age the beer.
Again in this case, bottle conditioning may be a better idea as there is a lower risk of oxidation and carbonation loss when there is less tranfering of beer going on.
For more information about which keg you should invest in, check out this article I wrote here.
Equipment needed to rack beer from a keg to a bottle
As I mentioned before, I’ve asked around to find all of the best methods to rack beer from a carbonated keg to a bottle so that no matter what your budget is, you’ll be able to do this.
Method one – Using A picnic dispenser
This is a great one for most of us as it involves a lot of the material most of us have lying around.
I just checked, I have everything I need in a draw in my brewhouse!
As explained by Mike over at brew-dudes.com, all you need is your regular picnic dispenser with its liquid post and an additional ‘bottle long’ piece of vinyal tubing. Make sure that you cut this at a 45° angle as it helps reduce foaming during the pour.
Equipment you’ll need:
Picnic keg dispenser tap

If you don’t have one, pick one up on Amazon
Food Grade Vinyl Tubing

More than likely you have some of this going spare, but if you don’t you can find it on Amazon too.
Method Two – counter-pressure system
You may have heard of ‘counter-pressure’ beer transfer, and this is an excellent method to use if you know how.
Basically, this works by pressurizing your sanitized and cleaned bottle to the same pressure as your keg.
This is done by attacking the bottles, which are PET twist bottles, to a counter-pressure device which you can hook up to your keg.
Then, you slowly equalize the pressure by twisting open your bottle while allowing CO2 to escape through your keg’s gas port too.
Carbonation Cap Counter Pressure Bottle Filler

The average homebrewer probably doesn’t have one of these sitting around, so pick up a unit today on Amazon.
PET beer bottles

If you don’t drink a lot of soda, you can actually buy these types of bottles on Amazon as well.
Method three – use a beer gun
If you have a little more money to invest and you want to try something a little less low-tech or fiddly, go with a specially designed ‘beer gun’.
There are a few items on the market from the Blichmann Beer gun to less well-known models such as this one found on Amazon.
With these units you literally just hook them up to your keg and point and ‘shoot’ the beer into the sanitized bottles.
VIFERR Counter Adjustable Pressure Bottle Filler

How to dispense beer from a keg with less foam
As we all know, on the cold side of brewing we want to limit splashing and sloshing as much as possible. The same is true of foam.
On the one hand, racking a very foamy beer from the keg into your beer with lead to uneven beer levels, but it could also lead to a lower carbonated product.
One advantage however of ‘capping’ onto foam is that it will give you a protective layer of CO2 which will limit your beer’s exposure to oxygen.
So, to avoid foam while transferring your beer to your bottle:
Reduce the pressure & dispense slower
Before you start pouring, turn off your CO2 canister and purge your keg. This will lower the pressure and get rid of that excess CO2 which would otherwise lead to a fast flowing beer.
Put your tube into the beer bottle ensuring that it reaches the very bottom of the bottle (method 1), then slowly turn on the gas until the beer starts to flow.
Keep the PSI low, around 1-3 and you’ll ensure a less foamy (but slower) pour which is much more manageable.
Use a thinner tube
Another tip mentioned by the ‘Dude Brews’ YouTube channel is to use a slightly thinner tube connecting your party dispenser and your keg.
A 3/16th tube will help you to reduce the foam and so in turn pour a more consistent amount of beer into each bottle.
Cut your ‘bottle wand’ tube at an angle
As I said before, if you cut the additional tubing that you attach to your picnic dispenser at a 45° angle, you can reduce the amount of splashing.
This works (not a scientist here) by allowing the tube to push right up against the bottle’s side and reduce the surface that the beer meets it at. Less surface area, less splashing and foam.
Chill your bottles
Another way to avoid foaming is to make sure that your keg and bottles are both cold.
Your keg is probably in a keezer or a fridge, so that should already be at about serving temperature.
For the bottles, you can chill them in a refrgerator for a few hours or even in the freezer (this is especially effective for a Growler).
the lower temperature will help reduce excessive foaming. Check out this article for more details on reducing foam in beer.
Does headspace matter?
Unlike with bottle conditioning where you have to account for a build-up in pressure, headspace is not as critical when racking from the keg.
Basically, your beer is already carbonated and, if anything, will become less so as some level of carbon dioxide will escape during the process.
So as a rule of thumb, leave the normal inch or so that you would when bottling beer straight from a fermenter. It’s really just a question of appearance at this stage.
What temperature to transfer at
You can rack beer from a keg at room temperature or while chilled, it really doesn’t matter for the actual beer. However, as mentioned before, you probably want to opt for the colder option as this will help reduce the amount of foam that is produced.
Can I transfer beer from a keg to a growler
It’s perfectly fine to rack beer from a keg to a growler and you can use one of the same methods mentioned above.
However, if you have a beer tap installed, don’t be afraid to simply fill it up directly from the tap or by connecting a length of tubing to the beer faucet.
Generally Growlers are used for pretty swift consumption of beer in the next few days, so excessive foaming won’t really matter here.


