
If you’ve ever tried to take an airlock apart and fill it up, you’ll know they are really fiddly things. You pour what seems like a tiny bit of liquid into them and they seem to overflow.
After filling, emptying, and refilling you may get frustrated and ask, how much water does this thing really need to work, am I good?
It’s important to fill an airlock with enough liquid that it forms a substantial gas barrier between the inside of the fermenter & the outside air. Unless otherwise indicated, filling the airlock to a third or half the way up the chamber will give you the best protection against contamination.
OK, that may seem pretty straightforward, but there is a lot more to airlocks than meets the eye. I’ve gone ahead and pulled together all the information you might need to know about using airlocks in your home brewery while you make increasingly excellent beer, so please read on.
What is an airlock for?
An airlock is essentially a shield between your fermenting beer and the outside world. However, in addition to keeping out the surrounding bacteria-rich air, it also allows gas by-products produced in the fermentation process to escape.
Although in truth there is little chance of air or contaminants from entering your beer, especially through a small opening, during the most energetic phases of fermentation. This is because carbon dioxide production is so great that while it’s escaping, it’s pretty much a one-way street.
However, in earlier and later phases of fermentation, having a liquid barrier between your beer and the outside world is essential for its protection. I’m of course talking about the protection from it tasting really, really bad!
Buy your brewing ingredients from homebrewing.org and get them delivered to your door!
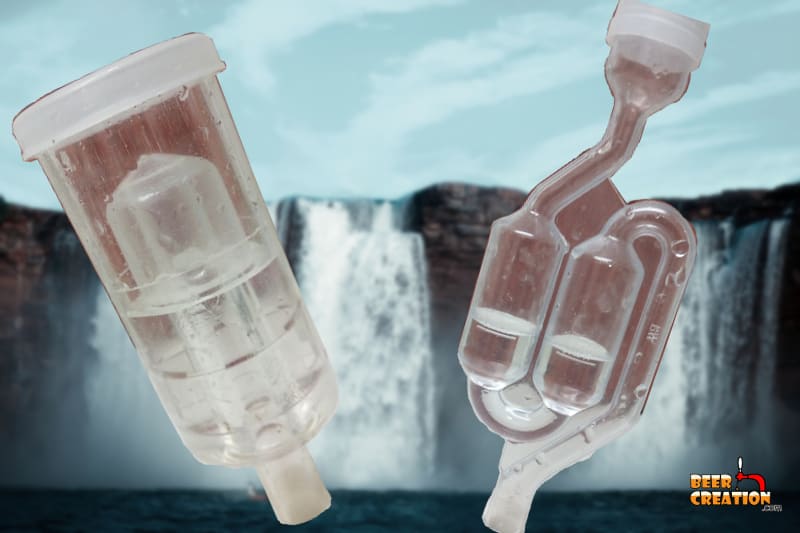
Airlock designs and how far to fill them up
There are two main designs and they are ideally only filled up with liquid as far as the maximum indication line. However, if you are just shy of the line or just over it won’t make a very big impact on fermentation.
S-curve airlock
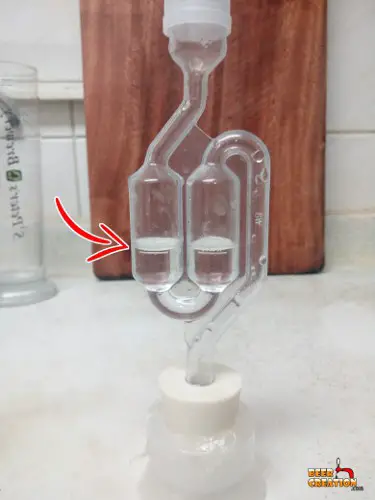
Ideally, you want to fill this airlock up so that the water sits at the bottom of the ‘S’ no more than a third of the way up the two internal chambers. This way gravity is helping you to keep the liquid in the airlock and not in your fermenter

3-Piece airlock
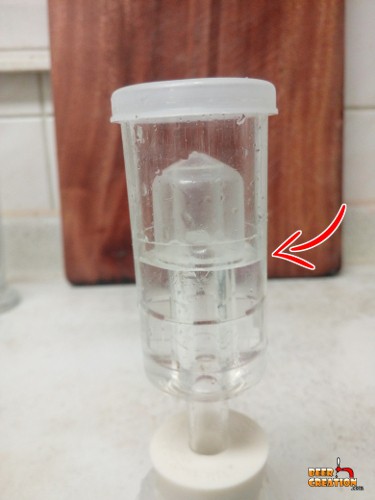
With the 3-piece airlock, you want to fill it up to about halfway along the chamber. This way the internal bubbler is submerged at the bottom and gas will have to force its way through the liquid to escape and won’t be able to get back into the bubbler.
What should you actually put in an airlock?
Here’s the thing, you were probably searching for how much water you should put in your airlock but is that the right liquid to be adding?
Well, although ordinary water is probably up to the job of being a liquid barrier, in homebrewing you don’t want to take any chances. This is why it’s best to use something which can help you combat the worst enemy to a homebrewer, off-flavor-producing bacteria!
So, the two best things to use in your airlock if you can get your hands on them are Star San (you can grab some on Amazon) and high-proof alcohol. You want to use it in a diluted solution with water where the concentration is no stronger than 330 ppm (about 1 fl oz per gallon of water)
Star San is generally used to sanitize brewing equipment and has one big advantage over other sanitizers such as bleach or iodophor, it’s a no-rinse sanitizer. So, you can use it without worrying that somehow it’ll get into your brew.
high proof alcohol, vodka, in particular, is a good alternative if you don’t have any Star San to spare. Again, it’s fairly good at keeping everything clean and if it happens to fall into the beer, at such low quantities it shouldn’t add too much to the ABV.
Do all airlocks need liquid?
There are two popular designs used in homebrewing and both of them need to be filled with liquid to do any good.
They work by keeping a slightly different atmospheric pressure between the inside of the fermenter and the outside world. When the pressure is too great, the gas molecules will force their way through the liquid barrier and escape into the world.
However, the air molecules outside aren’t able to do the same, thus keeping the beer safe from contamination. If there is no liquid in the airlock at all, you lose the protective barrier.
New to homebrewing? Please feel free to read my ultimate guide to brewing beer at home and where to start.

What happens if there’s no liquid in the airlock?
The level of danger to your beer really depends on when in the fermentation period this happens, but generally, it’s a bit of a worry.
If this occurs during the growth stage of fermentation when the yeast is energetically converting fermentable sugars into ethanol and CO2, the risk may be less than at other times. As long as there is a healthy stream of CO2 flowing through the airlock, even when empty, it’ll keep the air out.
But the same cannot be said for the earlier lag phase of fermentation or the later stable period after the foamy krausen has subsided. Not sure what krausen is exactly? Check out my article for more information.
If you forgot to fill your airlock at the very start when you racked your wort and then pitched it with yeast or the water was absorbed or evaporated (less likely), there could be an issue. The major issue is probably not going to be a bacteria infection, but is more likely to be an issue with oxidation.
If this has just happened to you, make sure you fill up your airlock fast and hope that nothing has changed the profile of your beer. Sometimes the homebrewing gods are kind!
How to fill up your airlock while it’s in use
If you find that your airlock is running low or completely empty, then it’s time to fill it up. But before you drag your entire fermenter to the faucet…
By far the best way to do this is to use a spare airlock if you have one. If you don’t have a spare you should seriously think about getting a couple more, they are quite inexpensive. In fact, you can get three for less than the average cost of a pint, over on Amazon or in your local homebrewing store.
Let’s imagine that you don’t have a spare. In this case, get yourself a bit of cheesecloth or even some plastic kitchen film, and as you lift out the airlock, being careful not to pour its contents into the fermenter, cover the hole.
Now, empty what’s left in your airlock and put it in some sanitizer, seeing that you just touched it. After 30-60 seconds, take it out and fill up the airlock to the correct level and place it back into your carboy bung, after removing the cheesecloth/plastic temporary barrier.
The quicker you do it and the more care you take using sanitizer, the less risk you’ll have of exposing your brew to the air and any bacteria from your hands.

Do you always need an airlock?
No, you don’t always need an airlock during fermentation, but you do need to have that air barrier for the best possible results.
One perfect alternative is called a blow-off tube. I tend to use one for the first couple of days of brewing while the yeast is getting really busy, then as the flow of CO2 gets less, I’ll switch back to an airlock. Sometimes, often in summer, when I am using a fermentation chamber (check out my article on this), I’ll only use a blow-off tube because it makes the overall fermenter much ‘shorter’.
A blow-off tube is simply a piece of food-grade tubing, like the one used in an auto-siphon, which fits in snuggly to a carboy stopper or bung.
The end that you put into the fermenter should be inserted in by perhaps an inch, way above the surface of the beer while the over should be put in a container of sanitizer or vodka. I tend to use a soda bottle of sanitizer, as the vodka is too useful to waste!
What happens if there’s foam in the airlock?
Sometimes you will get a very, very healthy krausen which will reach the very top of your fermenter and often push right through it!
There can be many causes of this, one of which can be a lack of headspace in the fermenter and you can read about this in my article here.
But, what do you do if you check on your beer and krausen is in your airlock, out your airlock, and halfway down the stairs? Well in this case the best thing to do is to remove the airlock as it could be doing more harm than good from a perspective of internal pressure, and just observe the krausen until it starts to subside.
You could also replace the airlock with a blow-off tube, as this may help you release the pressure and also keep a certain level of protection against anything getting in your beer. You can read my article about krausen in your blow-off tube or airlock to learn more about the dangers.
My airlock shot out, what happened?
If your airlock actually shot out of the top of your carboy, then that’s probably the same culprit as before, a very energetic yeast rapidly ingesting the nutrients in your beer and producing CO2.
Again, the best cause of action is to set up a blow-off tube for at least the first couple of days of any fermentation until you can see things calming down. You’ll know when the bubbles in your soda bottle of sanitizer slow down and/or when the krausen falls.
Do I need an airlock on a secondary fermenter?
Yes, even if you are transferring your beer from a primary fermenter to a secondary fermenter you still need to use an airlock or blow-off tube.
While it is true that you’ll probably get a lot less activity in your airlock on a secondary fermenter, this is exactly what you need one. Because there is less CO2 being produced in the later stages of fermentation, your beer is even more vulnerable to the negative influence of air and other contaminants. There will be much less of a natural blanket of CO2 coming off the surface of the beer.
If you want to know more about when you should actually rack your beer from a primary to a secondary fermenter and even if you should do it, then please read my more in-depth article here.
What happens when my airlock stops bubbling?
It’s perhaps the most exciting part of watching your beer ferment and also the most misleading for new homebrewers. Although seeing bubbles coming up out of your airlock is a good sign that fermentation is in full swing, when they slow or stop, it doesn’t necessarily mean fermentation has stopped.
The growth stage of fermentation can be over in a matter of days while your yeast may carry on fermenting your beer on the down-low for several days after airlock activity actually stops.
If you are using a fermenting bucket, then definitely don’t open it when you see this, give the beer at least a day or two more. If you are using a transparent carboy, check out the surface of the beer because you’ll probably see some bubbles on the surface.
It’s true that airlock activity is a good indicator of the start of fermentation, but the only sure way to tell if your fermentation has stopped or terminated is by taking a gravity reading with a hydrometer. If this is something you’re going through right now, you might like to check out my article on no airlock bubble activity for more information.
My fermenter sucked in the liquid in my airlock!
This can definitely happen if the ambient temperature is warmer than the actual temperature of your beer. If this is happening to you, try cooling down your brewing space to match your beer temperature.
If you can’t do that, make sure that you are using sanitizer or vodka in your airlock so that it’s sterilized. Although we’re only talking about very low quantities, you don’t want to risk your beer being contaminated with anything nasty.
Of course, fixing up a blow-off tube with a decent length of tube would put a stop to this as it’s unlikely the pressure would drop enough to suck water up such a long tube.

What happens if I put too much water in the airlock?
In my experience, this can be bad for one airlock design but not a huge problem for the other. With the S-curve design, when I overfill it, the liquid seems to come flowing out of the fermenter end, so it’s best to make sure you are just under or just over the maximum level.
However, with the 3-piece airlock design, you can almost fill the thing right up and it seems to be fine. This being said, I would always recommend you stick to the manufacturers’ guidelines and just monitor the airlock to make sure it’s still topped up.