
A hydrometer is perhaps THE most important piece of brewing kit you’ll ever own, yet some homebrewers never even use them.
It’s the measurement device that 99% of all your post-fermentation calculations are based on, so having an accurate tool is really important.
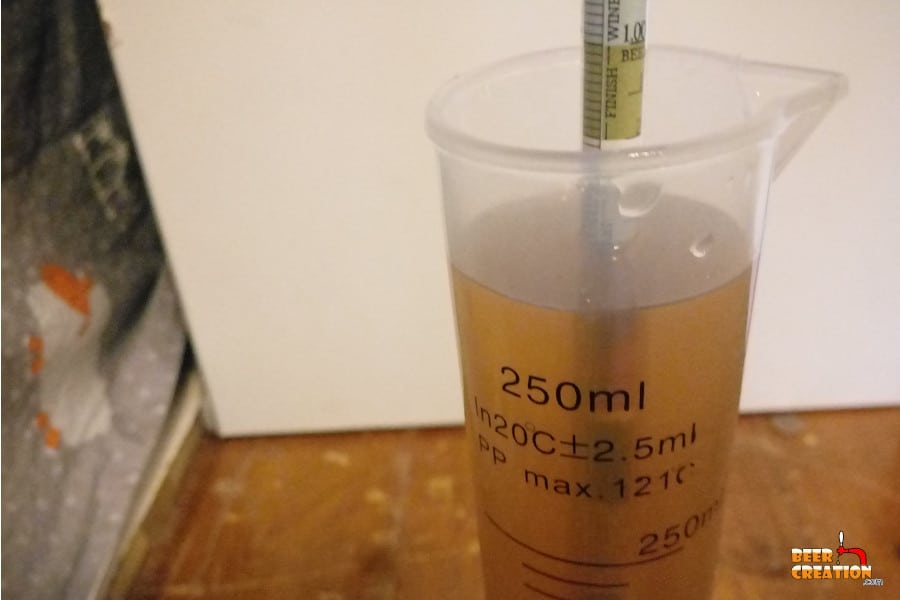
A hydrometer’s accuracy relies on calibration, temperature, its correct usage, and lack of damage to the instrument. Taking a reading from the correct place on the scale and in wort free of obstructions or solid matter increases accuracy. A poorly disolved wort sample or unsuitable measurement jar is also a factor.
As there is a little bit to know concerning this topic, I’ve gone into even more detail in the rest of this article so please feel free to read on.
How does a hydrometer actually work?
All variants of hydrometers, incorporate the physical law of buoyancy (Archimedes’ principle) where a solid object displaces its weight in liquid. Saccharometers, used in homebrewing, measure sugar content in wort and are calibrated to 1.000 in distilled water. The specific gravity is shown on the scale at the surface of the wort.
All hydrometers have a similar design. They are long with a thinner arm, where the scale is shown, and a bulbous bottom which contains metal shot as a counterweight.
When immersed in enough water, they float and by displacing their own weight they will show the specific gravity of the wort they are in.
As long as they read 1.000 in distilled water they will be accurate when placed in sugary wort.
What can affect a hydrometer reading?
In terms of why a hydrometer will show a reading of above 1.000, it’s simply due to the amount of sugar dissolved in the wort it is placed in.
The more sugar present in your wort, the higher your specific gravity will go.

After fermentation, that sugar is digested by yeast and so your final specific gravity reading (final gravity) will be lower than the initial reading (original gravity).
Talking of what can make your hydrometer inaccurate, well there are a few things to consider.
A hydrometer will be inaccurate if it or the measurement jar is dirty, has a lot of organic matter in it, or bubbles present. Also, if sugar in the wort hasn’t dissolved enough or been blended well the reading will be off. The temperature of the wort also affects the reading, which should always be taken from below the meniscus.
What does that mean in less robotic language? Well let’s go over those point in more detail.
Keep the hydrometer clean
If you have been brewing beer even for 5 minutes you know that we brewers are an OCD bunch.
When it comes to your hydrometer it’s not so much the usual fear of bacterial infection (but make sure you ditch any samples you take on the cold side of brewing- don’t put it back!) it’s actually an engineering issue.
If your hydrometer has any dried on organic matter, hops, or grains, for example, it could drastically change its reading. It’s just a question of weight.
The same can be said for the measurement jar that you use. You want that to be as pristine as the hydrometer.
You also want to make sure that your sample is fairly clean too. If you have a wort sample which is full of floating hops, grains or other solids it will really affect your reading.
If you need to strain your sample do it, you’ll probably see a big difference in the actual reading you get.

New to homebrewing? Please feel free to read my ultimate guide to brewing beer at home and where to start.
Be aware of bubbles in the jar
Another thing that can affect your hydrometer reading is having bubbles in your measurement jar.
These normally form around the stem of the hydrometer and apart from making it hard to see the scale on the side, they can influence its bouyancy.
You can normally get rid of the bubbles by spinning the hydrometer while pushing it under the surface more. Alternatively, you can do this by allowing the wort to sit for several minutes until the bubbles disappear.
Is the sugar evenly dissolved?
Something that isn’t realized by newer homebrewers is that the sugars you have extracted into your wort may not have dissolved evenly in it by the time you come to take your first specific gravity reading.
That is to say that the gravity reading you could get from a wort sample at the top and bottom of your brew kettle may not be the same.
But this is easily fixed.
Before fermentation, make sure that you give your wort a decent stir or shake. This is ok in terms of the risk of oxidation as we want to aerate the wort as much as possible at this stage.
After fermentation, try taking a few readings with your hydrometer during bottling or while racking your beer into the keg.
For example, take a reading before you start transferring your beer, another when about half the fermenter is empty, and perhaps a third when it’s nearly finished.

If they are all the same or thereabouts, you probably know that in the future you can trust the first reading.
Did you remember the temperature?
In addition to being calibrated to a specific gravity of 1.000 in distilled water, your hydrometer is also calibrated to this reading at a particular temperature.
Depending on the model of your hydrometer it will have been calibrated at a temperature of between 59°F and 68°F (15°C-20°C).
So, when you take a reading from your hot or cold wort, you simply need to use a hydrometer temperature calculator to adjust the visual reading.
Meniscus? come again?
The meniscus is just that little light refraction phenomenon you’ll see where the hydrometer and surface of the liquid meet.
Make sure that you take your reading from the bottom of that ‘bubble’ rather than from the top.
Can a hydrometer go bad?
Unlike machinery, hydrometers cannot degrade and become less accurate over time if undamaged. If giving an inaccurate reading, a hydrometer is probably being influenced by external factors or not being used correctly. Once damaged, however, a hydrometer becomes instantly unusable.
Basically, a hydrometer is so simply designed that it simply won’t stop doing what it is designed for until someone is using it wrong or breaks it.
In addition to the things which can affect your hydrometer which we covered above, there are also some other things to bear in mind, particularly with the measurement jar you are using.
Often hydrometers are sold with a corresponding cylinder in which you put your wort sample in. But if you are clumsy like me, you’ll probably make your way through quite a few of these fragile instruments in your brewing career.
This means that when it comes to brew day you might have quite a few measurement jars to choose from.
Make sure you get the right size jar
It might sound like a basic thing to get right, but it’s easy to forget. You need to match your hydrometer to the correct size jar.
Make sure that the jar is tall enough. If the hydrometer can easily sit on the bottom of the jar and the scale is already reading 1.000 on the rim, you just won’t get any sort of accurate reading.
Make sure that the jar is wide enough. You need about an inch or so (>25mm) separating the side of the hydrometer from the side of the jar. If the hydrometer is up against the side of the jar at any point it may not be totally submerged in the liquid and Archimedes’ principle can’t work.
Make sure you fill the jar up enough. Just with the first idea about the length of the jar, you need to give the hydrometer enough liquid to float in.
Ideally, you want the level of the wort with the hydrometer in it to be at the very rim of your jar. That makes taking a reading much easier. So just experiment and see how much wort you need to use.
How do I calibrate my hydrometer?
If you have any doubt at all about your hydrometer you can test its calibration.
All you need is your hydrometer, its measurement jar, and some distilled water which you can buy from most pharmacies.
Make sure that all your equipment is totally clean and free of your last brew day’s batch.
Fill up your jar with the distilled water, pop in the hydrometer, take note of the reading and temperature.

If needed, use an online calculator to make sure you are reading 1.000 as a base reading at the given temperature.
Assuming that you don’t get exactly 1.000, all you’ll need to do to keep using the hydrometer is to adapt your reading for wort in the future. So if you are a point under or over 1.000, you’ll just add or subtract this when taking a reading on brew day.
Does a hydrometer need to be calibrated?
If you’ve just bought a brand new hydrometer you probably don’t NEED to calibrate it. However, factory defects aren’t unknown and it won’t hurt if you just pop it in some distilled water and see.
If you’ve had the same hydrometer for years, you might want to check it from time to time simply because it will tell you immediately if it’s suffered any damage over the years.
As I said before, the hydrometer won’t become inaccurate purely due to use and time.
What happens if the hydrometer doesn’t float?
If a hydrometer doesn’t float it is either due to its misuse or damage. Make sure that the measurement jar is large enough for the hydrometer being used and is adequately filled with wort to at least three-quarters full. Also, check the hydrometer for cracks or liquid within the instrument itself.
Unfortunately, if your hydrometer isn’t floating and is literally sinking totally below the surface of the wort, it’s damaged beyond use.
This has happened to me on a number of occasions when the hydrometer has been cracked during cleaning and this has compromised its bouyancy.
If any liquid is swilling around the inside of your hydrometer, it’s time to get a new one.
However, if the hydrometer seems undamaged, you should test it in a large saucepan of water (making sure it’s deep enough for the length of the hydrometer plus about 50%).
If the hydrometer still doesn’t float in all that water without anything visually touching it, you’ve got yourself a dud and probably need to buy a different brand of hydrometer next time.
How do you adjust a hydrometer?
If you have a hydrometer that, for whatever reason, doesn’t give a 100% accurate reading when being used properly, you just have to adapt how you use it.
Regarding actually adjusting the hydrometer itself, I haven’t really heard of anyone actively doing this.
All you would logically have to do is to add the correct amount of weight to make it float at the correct level for the given parameters.
However, it’s a lot less trouble to simply allow for the differences in your calculations.
How can I make my hydrometer more accurate?
The only way I know to increase the accuracy of a hydrometer is to learn how to use it properly.
Make sure that you aren’t making any of the mistakes I’ve covered above and you will have as accurate a measurement instrument as you can in your home brew house.
