
So, it’s your first time brewing beer and you have just found out that you need to cool the wort before adding the yeast, but how do you do it with no equipment.
Don’t fret. An ice bath is a tried and tested method to cool wort down effectively even on the hottest day. However, there are still some things you can do to make it happen a lot quicker.
Effective wort chilling with an ice bath can be achieved when you reduce the wort to cold water ratio. More contact between the ice and the brew kettle’s surface will also reduce cooling times as will choosing a better heat-conducting material. Recirculating icy water also cools wort faster.
As you are more than likely to use an ice bath for the first handful of batches you produce, it’s a good idea to get off on the right foot.
Below I’ve gone through all the best methods to increase the wort cooling time when using an ice bath, so read on for more information.
What is an ice bath exactly?
This is an excellent question and it’s a good idea to start off really understanding what you are working with here.
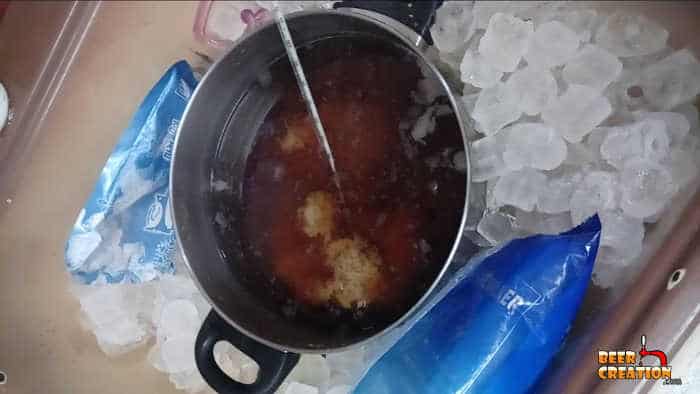
In home brewing, an ice bath means any container which is filled with very cold water, solid ice cubes, or both in which a brew kettle (or pot) can be placed.
Through the contact of the brew kettle’s walls with the colder liquid (and solid), the wort itself cools down more quickly than if left to cool naturally.
Many brewers simply fill up a sink with ice, but a bucket or beer cooler could work just as well as long as it fits comfortably inside.
New to homebrewing? Please feel free to read my ultimate guide to brewing beer at home and where to start.

How long does it take to cool wort in ice bath?
According to the very well-informed J Palmer, it will take about 30 minutes for wort in an ice bath too cool to 80°F/26°C. But that’s still too warm to pitch most strains of yeast, so expect a little longer to get your wort to the right temperature.
Also, you need to consider several other factors that will affect the speed at which your wort cools. This included but are not limited to:
- the size of your batch
- the amount of ice/icy water being used
- whether the pot is covered or not
- the material of the pot being used
- whether the wort is circulating or not
- the ambient temperature of the room
There are many things you can do in order to reduce the cooling time when using the ice bath technique, which we are going to talk about now.
Method #1: Partial boils
If we assume that you have no other method of cooling your wort other than an ice bath, then reducing your overall wort quantity is a great way to increase the speed of cooling.
Rather than boiling up the full batch yield (or more to account for boil-off), you can cut your quantity of wort down to 2.5-3 gallons.
If you are working from an extract kit, then this is absolutely fine as most kits are designed to be brewed this way. If you are brewing from your own recipe, then you need to be sure that you have calculated your grain bill and hops bills correctly so you can still hit right Original Gravity when you add water later. (Shop for your hops online at homebrewing.org).
By halving the amount of wort you have to chill you will see the cooling time will take a lot less time than will twice as much boiling wort. This also has its advantages if you brew on a small scale because you may not even have to buy any specialist brew kettle to accommodate such a modest amount of wort.
Method #2: Use a full-size bath
On the other end of the spectrum is to use proportionally more cold water to wort. If you fill up a conventional bath by about a quarter then add enough ice to cover the surface of the water for about 30 minutes to 1 hour before you need to cool your wort. Then when you place the pot in the cold water, add another couple of bags.
This will create a larger body of very cold water which will remain at a very low temperature for a longer time than in a smaller container.
With an average batch size or smaller, you will see that your wort cools in less than 30 minutes without you having to do anything else. Just be sure to get as much contact as you can between the surrounding cool water and the brew kettle.

However, it is true that this is a lot of work in order to cool the wort and is rather wasteful in resources. It may not be the best method if you are brewing on a regular basis or are at all concerned about the environment.
Method #3: Keep it moving
By far the best way in which to use an ice bath effectively is to keep all the liquids moving.
For this method, you really need a container that gives you enough space around the brew kettle to work with as well as the ability to add and drain the water away.
The idea is to keep adding ice to the cooling water as previously added ice begins to melt. This could also be done with extremely cold water by setting up a simple pump system to recirculate water. (Please check out my article on the best brewing pumps for some ideas.
At the same time as you are replacing or recirculating the cooling water, which works really well in a larger size beer cooler, you should be gently stirring the wort itself.
By stirring the wort as it cools you are making sure that more wort comes into contact with the cooler walls of the brew kettle. This will lead to much faster cooling.
Just be careful that you don’t splash the wort around too much as this could lead to too much air getting into the wort resulting in oxidation. Also, make sure that no water drips from your hands or arms into the wort, as you may have some contaminates on your skin which will affect your wort once it begins to cool.
Equipment for better cooling
If you plan to use ice baths as your staple method of cooling, then consider the type of vessel you brew in.
All cooling methods in brewing rely on the process of heat exchange and for us, that really boils down to which type of metal our brew kettle is made from. Although stainless steel is very popular due to its durability and lower price, it’s not the best conductor.
Aluminum and copper are far better at absorbing and dissipating heat than stainless steel, so if you are able to you could buy a pot made of one of these metals to reduce your cooling time.

Kitchen Sense Aluminum Stock Pot (4 gallon)

This size pot would be plenty for a partial boil of 2.5 gallons without the worry of having a boil over.
See latest price and availability on Amazon
Camp Chef Aluminum Hot Water Pot (5 gallons)

Also, a good pot for partial boils of up to 4 gallons but this model comes with a handy spigot which will make it much easier to rack the wort into your fermenter once it’s cool.
See latest price and availability on Amazon
Lid on or lid off when cooling?
This is one of those questions which most brewers cannot agree on.
We all know that it’s best to boil wort with the lid off because this will allow DMS to escape and not form in the wort. If we didn’t do this then the finished beer may develop an off-flavor similar to burned corn. But what about when you are cooling the wort?
There is a fear that if you leave the wort exposed as it cools then it will become susceptible to any contaminants present in the air. This is true, but as long as the wort is still hot the DMS is also still present.
So, my personal stance is that you should cool the wort with the lid off but be vigilant to any insects which are buzzing around, especially one the steam starts to subside.
Can you use ice to cool wort?
Again, this is a fair question.
It’s perfectly ok to add ice to your wort but you do need to be aware of a few things if you do.
- adding ice will dilute the wort
- ice can contain dormant bacteria
- ice packs can leach chemicals into the wort
- containers with ice inside can harbor bacteria
If you want to learn more about the benefits and drawbacks of using ice directly in your wort, then please read my in-depth article: The Real Dangers & Benefits Of Cooling Your Wort With Ice.
Are wort chillers more efficient than an ice bath?
Generally, wort chillers, whichever model or type, will be more efficient than an ice bath if used with very cold water. As water is pumped through a wort chiller and extracted it cools faster than an ice bath where the liquid is generally static.
Some models of wort chillers can be very inexpensive and may save you many hours during your brewing career compared to using an ice bath.
For my favorite brands and models of wort chillers, feel free to check out my article on the best wort chillers to buy.
Can you use ice baths with a wort chiller?
Yes, you can use an ice bath in conjunction with a wort chiller in two main ways.
Method #1:
As you use your immersion, counterflow, or plate wort chiller to cool your wort, you can place the brew kettle in a conventional icebath. The two techniques together will help you knock off several minutes to the time it takes to cool your wort.
Method #2
You can also use an ice bath to help cool the water you are pushing through your wort chiller. This involves placing two wort chillers in a series, one of which must be an immersion chiller sitting in a beer cooler, or similar container, of icy water.
This can be taken a step further by recirculating the icy water and pumping it through one or two wort chillers in order not to waste water (read my article for more details).