
Whenever I am cooling down wort with a wort chiller I always wonder if I could do it faster. There are definitely several factors at play, but one of them is certainly the size, or length, of the wort chiller itself.
So, if you are in the market for a new wort chiller, how many feet should you get?
For immersion & counterflow chillers the minimum length should be 25 feet. Ideally, you should opt for a 50-foot model if you can afford it. But, a larger wort chiller isn’t always appropriate for every brewer. Plate chillers with more plates are more efficient. Water temperature is also a factor.
Unfortunately, it’s not as simple as saying get a longer or bigger wort chiller and everything will be great, there are several other factors which come into play here.
Luckily, I’ve gone through everything you’ll need to know so that you can choose the best option for your own home brewery.
What type of wort chiller to choose
If you are just doing a bit of research, then it might be a good idea to start at the very beginning and talk about what a wort chiller is, what it does and the common models on the market.
Why might you need a wort chiller?
Wort chillers are useful pieces of kit but by no means necessary, so don’t feel like you MUST buy one. This being said, they will significantly reduce your brew day by a couple of hours at least. If you want to learn about alternatives to a wort chiller, check out the bottom of this article.
A wort chiller works by the heat exchange effect. The heat from the recently boiled wort is reduced through the effect of cooler water flowing through it, in a tube of course.
If enough cooler water is pumped through the chiller the wort will soon be reduced to the perfect pitching temperature at which point you can add your yeast to the wort.
Types of wort chillers
There are three popular types of wort chiller: immersion, counterflow, and plate.

Immersion wort chiller
This is perhaps the most popular, or at least the most used, for beginners and expert homebrewers alike. I think this is because an immersion chiller doesn’t require any additional equipment.
An immersion chiller, as the name suggests, is one which you fully immerse in the wort itself. It is basically a coiled length of copper or steel tubing which allows the brewer to cool the wort directly in the brew kettle.
Another advantage of the immersion wort chiller is that it doesn’t require any pump system or additional tubing, nor does it requite sanitizing (see my article about this for more information).
Counterflow wort chiller
The counterflow wort chiller is a step up from the immersion chiller in terms of design, but not by that much. These types of wort chillers are used externally and the wort is pumped through one internal tube while water is pumped in the opposite direction through an adjacent tube.
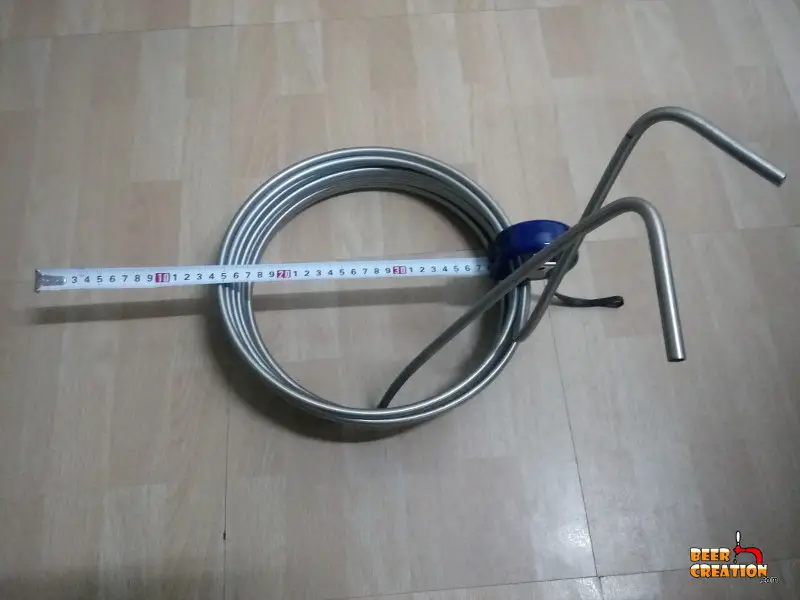
Both counterflow and immersion chillers are coils of metal tubing, so they are measured in length. The more coils available the better the cooling effect of the wort chiller.
Plate wort chiller
A plate wort chiller is a very different design to the other two types but works on exactly the same principle of heat exchange.
Instead of pumping wort and water through coils, the plate chiller pushes the two liquids through thin heat exchange plates. Again, the more plates the better the overall cooling effect.
If you are at all considering a counterflow or plate wort chiller, you need a good pump as part of your kit. Have a look at my article for more information: Best Pump For Wort Chillers (Immersion, Counterflow & Plate)
New to homebrewing? Please feel free to read my ultimate guide to brewing beer at home and where to start.
Buying a wort chiller
For the majority of homebrewers, buying a wort chiller is the best option simply because you are guaranteed to get something which does the job it’s supposed to do.

Nevertheless, there are some things which you should be aware of before you click ‘buy’, especially for an immersion wort chiller, namely:
- the length of the wort chiller
- the diameter of the wort chiller
- the height of the wort chiller
- the weight of the wort chiller
- the height of your brew kettle
- the diameter of your brew kettle
Unsurprisingly, the size of the immersion wort chiller that you can buy depends on the size of the brew kettle you brew in. The immersion chiller has to fit comfortably inside the brew kettle, so this is the best place to start. If you haven’t bought yourself a good brew kettle yet, see my suggestions in my article about the best size kettle to buy.
Things to consider before buying an immersion chiller
Many models of immersion wort chiller will come with a 25 foot and a 50-foot model, or some variation on those lengths. There is no question that a longer coiled wort chiller is going to be better, but it might not be suitable for all brewers.
So here are some things you need to avoid in order to speed up your wort chilling.
Is your brew kettle too small?
Diameter: Make sure that you fit the immersion chiller to the brew kettle. Measure the diameter of your brew kettle and wort chiller, you want to have at least an inch or two (if not more) to play with. Stirring your wort as you chill it will ensure that it cools faster, so you need space to do this around or inside the coil.
Height: Also consider the height of the coils and the level of the wort. It’s important that the wort chiller is submerged in order for it to work more efficiently.
Another consideration, something I didn’t realize when I first bought an immersion chiller, is the arrangement of the coils.
Ideally, you want the coils to be arranged so they can cover the entire volume of the wort from the bottom of the brew kettle to just under the surface. If you only have coils at the very bottom of the pot, it’ll only cool down this area!
Weight: If you are brewing in a brew kettle which only has a capacity of, say, 5 gallons and the level of the wort is right at the rim, what will happen when you put your wort chiller in?
Eureka, you’ll lose the displaced wort as the weight of the wort chiller enters the brew kettle. Ideally, you will have a couple of gallons, in terms of volume, to play with, but if you don’t then you need to be aware of this factor. The best way is to test it with the equivalent quantity of water before you brew your next batch.

Counterflow & Plate chillers
In terms of counterflow and plate wort chillers, I really do recommend that you get the longest, or biggest you can in your price range. The longer the coil or the more plates the better.
Northern Brewer Silver Serpent

Check out the latest prices and deals on Amazon.
NY Brew Supply Deluxe

Check out the latest prices and deals on Amazon.
HFS(R) Homebrew Beer Wort Chiller

Check out the latest prices and deals on Amazon.
DIY wort chiller
If you are making your own wort chiller, especially an immersion chiller, you need to do some math first so that you don’t end up with something too wide or, worse, too tall.
Calculating length from diameter and thickness
In order to calculate the total length of your wort chiller, as in all the tubing you’ve used, you need to know the outside diameter (OD), inside diameter (ID), and thickness.
The formula is as follows:
L = 3,14/4*(OD^2-ID^2)/(T*1000)
Note: ^ = to the power of X
For example, a coil with OD = 1600mm, ID = 508mm and T = 0,6mm results in a length of 3010 meters. (source)
Size vs efficiency
As we have mentioned in this article, having a longer wort chiller or one with more capacity for heat exchange will give you better cooling efficiency, but that is dependent on one key factor…the temperature of the water you are using.
In many places around the world, and this country, during summer the groundwater temperature can be higher than the pitching temperature you need. This means that even if you had a 1000-foot long wort chiller, you’ll never reduce the temperature of your wort enough.
So, if you want to improve the efficiency of your wort chilling, then you also need to consider the temperature of your cooling water.
There are two main ways that I can think of in order to reduce the temperature of the water that you are using, one involves a second wort chiller and the other involves a closed cooling system and a pump.
Using a pre-chiller
If you have found that your groundwater is too hot for pitching during the height of summer, then buying a second immersion chiller as a pre-chiller could be the answer.
What you need to do is to hook up your first wort chiller to your water supply, then sit it in a bucket of ice water. You then hook up the wort chiller you will immerse in your wort to the one in the ice bucket. This way the water which is being delivered to your brew kettle will be cooler than it is when it comes out of the main faucet.
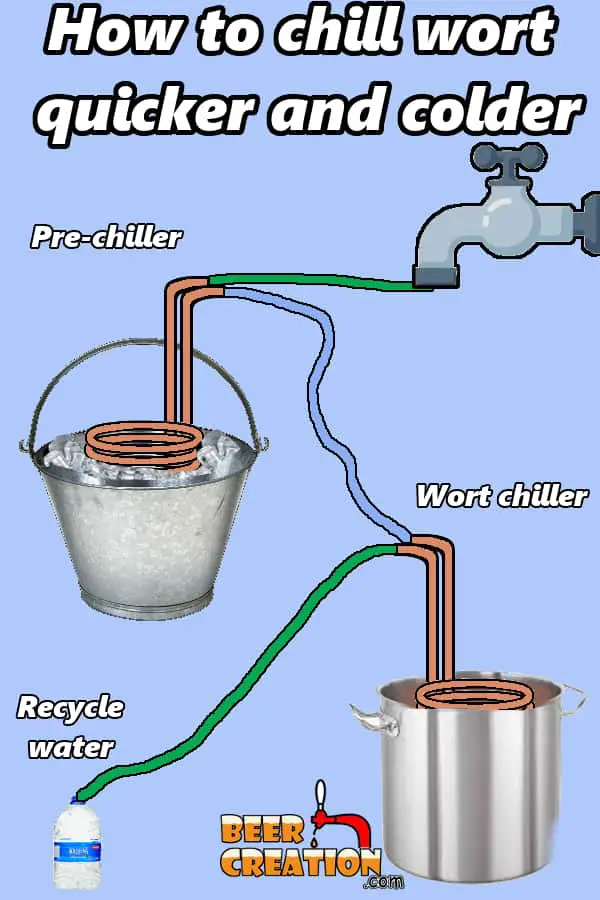
Water wastage
However, even with a pre-chiller, you will be wasting a heck of a lot of water, which is really something you should be trying to avoid.
So, a good way to reduce water wastage is to use a closed cooling system. You’ll need a conventional beer cooler, an aquarium pump, and a single wort chiller.
Fill up the cooler with water and ice and connect your wort chiller input tube to the pump which you then place in the cooler. Next place and secure your output tube from the wort chiller so that it flows back into the cooler.
This way you will use a lot less water than if you simply turned on the faucet and allowed the water to flow away. Of course, you will need to add ice periodically to keep the temperature down, but even this can be reduced if you use ice packs instead, which are reusable.
If you’d like to learn more about this method, read my article here.

Alternative cooling methods
Of course, a wort chiller is not an essential piece of kit and you can still successfully brew beer without having one. Brewers have been making beer for centuries without such equipment, so if you really don’t want to use one then there are alternatives out there.
Using ice
Most newer brewers will have heard of an ice bath when you place your brew kettle in ice to cool it down. But what about using ice directly in your wort, is that possible?
I explain everything about using ice in cooling your wort in a separate article, so if you want to find out more check it out: The Real Dangers & Benefits Of Cooling Your Wort With Ice.
Cooling overnight
For me, this is a favorite method of cooling, especially during winter or when I know that the clarity of my beer isn’t an issue. Despite what many brewers may think, leaving your wort to chill in a fermenter is a tried and tested method which has been passed down over the centuries.
For more information and my own experience of cooling wort overnight, check out my in-depth article.
Using a freezer
Is it possible to cool wort in a freezer? Well, this is something I asked myself and I really didn’t know the answer until I did a lot of research. There were a bunch of things which I hadn’t considered and so I wrote another article all about the answers I found: Chilling Wort In Freezers – Everything You Ever Need To Know.
Bigger plate chillers & longer counterflow chillers
Will a bigger plate chiller or a longer counterflow chiller cool your wort more quickly? Yes, without a doubt. They will even cool it down more quickly than an immersion chiller. However, this is still only the case if the water you are using for cooling is cold enough.
Saving money on wort chillers
If you are at all interested in saving money on wort chillers or want to avoid buying them at all then I recommend you read my article: How to Cool Down Wort Fast (With & Without Pricey Equipment)